Image to SVG for xTool: Built-In Trace or Clean SVG?
Choose between xTool Creative Space Image Trace and an imported clean SVG, then check contours, stray regions, nodes, scale, and laser operations after import.
On this page
- Built-in trace or imported SVG: the quick choice
- Route 1: trace the bitmap inside XCS
- Route 2: import a cleaned SVG
- The same-source audit: compare what the laser receives
- 1. Contours and holes
- 2. Stray regions
- 3. Path density
- 4. Size and placement
- 5. Operation assignment
- 6. Material test
- Common failures after xTool SVG import
- Where PerfectVector fits
- FAQ
- Sources
To convert an image to SVG for xTool Creative Space, you have two sensible routes: trace the bitmap inside XCS, or convert it elsewhere and import a cleaned SVG. Use the built-in trace for simple artwork that responds well to its controls. Import a cleaned SVG when you need to remove noise, reduce path density, or inspect the geometry before it reaches XCS.
Neither route makes the laser decisions for you. After tracing or importing, you still need to check the contours, remove stray regions, confirm the size, assign cut, score, or engrave operations, and test the job on suitable scrap.
The short answer
- Use XCS Image Trace for a clear logo, silhouette, or line drawing when you want to tune the result in the same workspace.
- Import a cleaned SVG when the source has rough edges, many color fragments, or a native trace that becomes difficult to inspect.
- Keep the bitmap when the goal is tonal engraving rather than vector cutting or scoring.
- Whichever route you choose, audit the geometry and machine setup before processing material.
Built-in trace or imported SVG: the quick choice
| Situation | Better starting route | Why |
|---|---|---|
| High-contrast silhouette or simple logo | XCS Image Trace | Fast to tune without leaving the project |
| Single-color line drawing that needs a center path | XCS center tracing | Designed to follow the middle of a color block rather than both boundaries |
| Flat multicolor art with obvious regions | Either | XCS can layer by color; an external vectorizer lets you inspect regions before import |
| Noisy PNG, compressed edge, or many tiny color patches | Clean SVG first | Noise can become stray regions and dense paths |
| Photograph intended for shaded engraving | Keep the bitmap | A vector outline throws away tonal information |
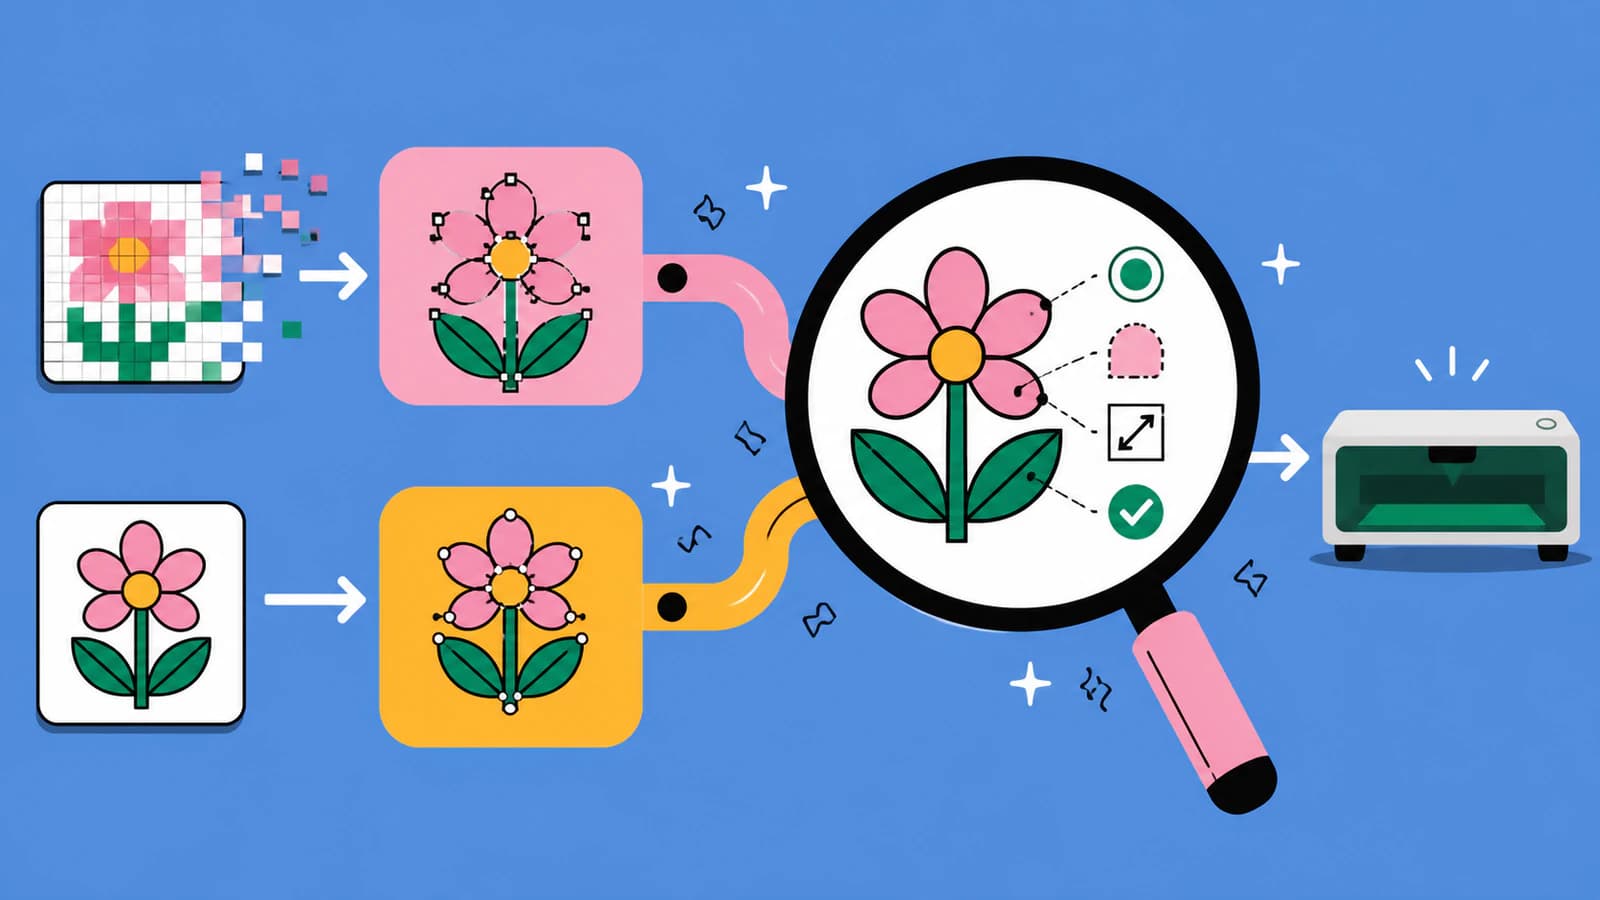
The comparison is not about declaring a universal winner. Run the same source through both routes when the first result is questionable, then keep the geometry that is easier to understand and prepare.
Route 1: trace the bitmap inside XCS
xTool documents a Trace function that turns a bitmap into vector geometry. Its auto-trace mode follows the edges of color blocks, while center tracing follows the middle of single-color blocks or line drawings. Auto-trace is a reasonable first try for flat art with distinct areas. Center tracing is the more relevant option when one intended line should not become two boundary contours. xTool's Image Trace guide explains both modes and their source-image fit.
A practical native workflow looks like this:
- Import the sharpest bitmap you have.
- Open the Trace function and choose auto-trace or center tracing based on the intended geometry.
- Adjust fuzziness to decide how finely XCS separates colors.
- Raise denoising only enough to remove unwanted small regions.
- Adjust smoothness while watching corners and small holes.
- Save the trace, move it away from the source bitmap, and inspect the result at a high zoom.
Fuzziness, denoising, and smoothness solve different problems. A broader fuzziness threshold groups colors more coarsely. Denoising ignores small color blocks. Smoothness reduces pixel-shaped sharpness. Pushing any of them too far can also remove wanted detail, so judge the visible geometry rather than hunting for a standard setting.
For artwork with clear color divisions, XCS also documents Layering by color. The resulting vector can be ungrouped so sections can be edited or removed, which is useful when different regions need different processing methods. That feature is a workflow aid, not an automatic operation plan; you still choose what each region should do. xTool's layering guide shows the documented trace-and-save flow.
Route 2: import a cleaned SVG
The external route moves the tracing decision earlier. Convert the bitmap into SVG, inspect the paths, simplify or remove unwanted regions, then import that file into XCS. This route is useful when XCS produces a dense trace, when you want to compare outputs before opening the machine project, or when the same SVG must travel to another vector-aware application.
An SVG is not clean merely because its filename ends in .svg. The format can hold path geometry, but the quality of those paths still depends on how the artwork was built. The SVG 2 paths specification defines the commands and coordinates that describe outlines; it does not promise that a particular trace uses sensible contours or an efficient number of points.
Before import, check that:
- intended cut regions have complete boundaries;
- thin lines are represented as the type of path you actually need;
- tiny background pieces and isolated specks are gone;
- text has been converted to paths if the design contains lettering;
- the file uses straightforward SVG geometry rather than editor-specific features.
XCS supports SVG import, but xTool notes that complexity is tied to curve count and that too many curves can prevent a file from opening properly. Its import FAQ also says XCS does not process live text in SVG and recommends converting graphics to paths and exporting Plain SVG when parsing fails. The official xTool import FAQ is the relevant compatibility reference.
The same-source audit: compare what the laser receives
If the native and external routes both look acceptable at normal zoom, compare them with the same checklist. Do not pick the smoother thumbnail. Pick the version whose structure matches the job.
1. Contours and holes
Trace around every intended cut boundary. Look for a gap that would leave a part attached, a hole that has filled, or a thin stroke that became two outlines. Closed contours matter when the operation depends on a complete boundary, but an intentionally open score line should remain open. The right geometry follows the design intent, not a blanket rule that every path must close.
2. Stray regions
Zoom beyond the level you used to judge the picture. Compression blocks, dust, and a nontransparent background can turn into tiny shapes. Delete anything the laser should not visit. If a speck appears in both traces, fix the source rather than repeatedly tuning around it.
3. Path density
Compare the node pattern along curves and corners. More points are not automatically more accurate. A curve should use enough nodes to preserve its shape without following every pixel wobble. If import becomes slow or editing feels fragile, use the checks in why an SVG has too many nodes before assuming the machine is at fault.
4. Size and placement
After import, measure the design in XCS. Do not assume that a correct-looking preview has the intended physical dimensions. Confirm width, height, and placement on the canvas, especially when the file moved through more than one application.
5. Operation assignment
An imported PNG is treated as a bitmap for engraving in XCS, while vector geometry can be assigned to vector operations. That still does not mean every SVG path should cut. Decide which regions cut, score, or engrave, then review the project preview. For the wider cut-versus-engrave decision, see the image-to-SVG laser cutting guide.
6. Material test
Geometry inspection cannot choose power, speed, passes, focus, or material settings. Use current machine and material guidance, then run a small test on appropriate scrap. The test should confirm the operation mapping, dimensions, path order, and physical result before you commit the full piece.
Common failures after xTool SVG import
| What you see | Likely cause | What to check |
|---|---|---|
| SVG will not open or XCS becomes slow | Excessive curve complexity | Simplify the source and remove hidden or stray geometry |
| Lettering disappears or changes | Live text or unsupported editor structure | Convert text and graphics to paths; export Plain SVG |
| A thin line cuts twice | Outline trace captured both edges | Use center tracing or redraw one intended path |
| Small dots appear as operations | Bitmap noise became vector regions | Increase denoising carefully or clean the SVG before import |
| Design imports at an unexpected size | Dimensions changed between applications | Measure and reset the final size in XCS |
| Photo loses shading after tracing | Tonal raster art was reduced to contours | Return to the bitmap and use an engraving workflow |
If another laser application is part of your workflow, its native trace will have different controls. The decision is still similar. LightBurn's Trace Image workflow is a useful comparison because it also separates tracing from the later operation setup.
Where PerfectVector fits
PerfectVector handles the raster-to-vector stage, not the machine setup. For suitable flat artwork, convert the image into an SVG for laser work, inspect the reconstructed regions, and download the SVG. Then import it into XCS and run the same contour, stray-region, path-density, size, and operation checks above.
That route is most useful when you want an inspectable SVG before entering XCS. It does not replace Image Trace when the built-in result is already simple and easy to edit, and it does not select laser settings for your machine or material.
FAQ
Can xTool Creative Space convert an image to a vector? Yes. XCS has a Trace function for converting bitmaps into vector geometry. Auto-trace follows color-block edges, center tracing follows the middle of single-color blocks or line drawings, and layering by color can separate obvious color regions for editing.
Do I need to convert every PNG to SVG for xTool? No. Keep a PNG as a bitmap when the goal is tonal engraving. Convert or trace it when you need vector geometry for cutting, scoring, scalable shapes, or separately editable regions.
Is XCS Image Trace better than an external SVG converter? Not for every source. XCS is convenient for simple art and keeps the work in one project. An external converter is useful when you want to inspect, simplify, or compare the SVG before import. Judge both by contours, stray regions, path density, scale, and editability.
Why will my SVG not open in xTool Creative Space? The file may contain too many curves, live text, or structures XCS cannot parse. Remove unnecessary geometry, convert text and graphics to paths, export Plain SVG, and try the simplified file again.
Does a clean SVG choose cut, score, power, and speed for me? No. SVG supplies geometry. In XCS, you assign the intended operation and choose settings for the machine, material, and job. Check the preview and run a small material test before the final piece.
Sources
- xTool Support — FAQs on Importing Images — supported import formats, bitmap behavior, curve-count complexity, live text, and Plain SVG guidance.
- xTool Support — Turn Bitmap into Vector with XCS Image Trace — auto-trace, center tracing, fuzziness, denoising, smoothness, and source-image guidance.
- xTool Support — Image Trace and Layering by Color — color-layer tracing, ungrouping, editing, and multiple processing-method examples.
- W3C — SVG 2 Paths — normative path-data and geometric-outline definitions.
Have a flat image ready to test? Convert it to SVG for laser cutting, import it into XCS, and choose the file only after its contours, stray regions, scale, and operation assignments pass the audit.
More from the blog

LightBurn Cuts Outside First: Check Groups and Layers
Diagnose outside-first LightBurn cuts with a simple SVG, closed-path checks, group and layer review, and Preview verification before choosing the job order.
AI Art for Laser Engraving: The Prompt Was the Easy Part
Generating the artwork is solved. Turning it into a file your laser will cut, score, or engrave correctly is where AI art gets difficult. Here is that half.