Pinback Button Artwork: Face, Wrap and Safe Area
Prepare pinback button artwork with a measured radial example. Keep the logo on the face, preserve the template size, and follow the maker's bleed instructions.
On this page
- Read the safe area, face and cut boundary separately
- A detail can fit the cut circle and miss the face
- Resize the mark without resizing the template
- Follow the maker's background instructions exactly
- Check the delivered artwork at its nominal size
- Choose vector or raster for the artwork you have
- FAQ
- Sources
For a pinback button, keep essential lettering and logo details inside the template's safe area. The larger printed circle includes material that wraps around the shell; its cut diameter is not the front-facing logo area. A design can fit inside the paper circle and still lose a meaningful detail around the edge.
Start with the template for the actual button and press. PureButtons' template instructions explicitly warn that text and logos outside its safety zone can wrap around the sides. Its proof layer shows the front separately from the full artwork. That distinction is the useful check before you print a sheet.
Read the safe area, face and cut boundary separately
This guide concerns printed paper artwork pressed around a button shell. An enamel pin's production artwork has different material and geometry requirements. Likewise, a flat acrylic charm layout does not establish a button's wrap allowance.
Use the labels and dimensions supplied for your chosen product. Templates may call the central region a safe zone, image area or live area, and may show additional rim-text or background guides.
| Region or boundary | What to check |
|---|---|
| Safe area | Important letters, faces and logo details remain inside the maker's protected region |
| Face | The part of the design intended to be read from the front |
| Wrap region | Artwork outside the front continues around the shell or toward the back; it cannot be treated as spare front-facing space |
| Cut boundary | The size of the paper piece, separate from the useful front area |
A safe-area circle also differs from a brand's clear-space rule. Clear space describes the room other content must leave around a logo. You may need both constraints: fit the complete logo and its required margin inside the available safe region. Our logo clear-space calculation explains how to preserve that margin.
A detail can fit the cut circle and miss the face
We authored an original DAYTRAIL mountain-and-sun emblem and placed it in a sample circular layout. The example has three guide circles and one shaded wrap band:
| Sample measurement | Diameter | Radius |
|---|---|---|
| Safe circle | 38 mm | 19 mm |
| Face circle | 44 mm | 22 mm |
| Cut circle | 54 mm | 27 mm |
The shaded sample wrap band runs from the 22 mm face radius to the 27 mm cut radius. These dimensions are invented for this explanation. They are not a template for a named button size, a machine setting or a recommended safety allowance.
The emblem's sun is a circle with a 4 mm radius, centered 20 mm right and 10 mm above the layout center. Its farthest point is about 26.36 mm from the center: the center-to-sun distance, about 22.36 mm, plus its 4 mm radius. It fits inside our 27 mm cut radius but extends beyond the 22 mm face radius.
That is the failure we wanted to reproduce. Checking only whether the artwork fits inside the cut circle would miss it.
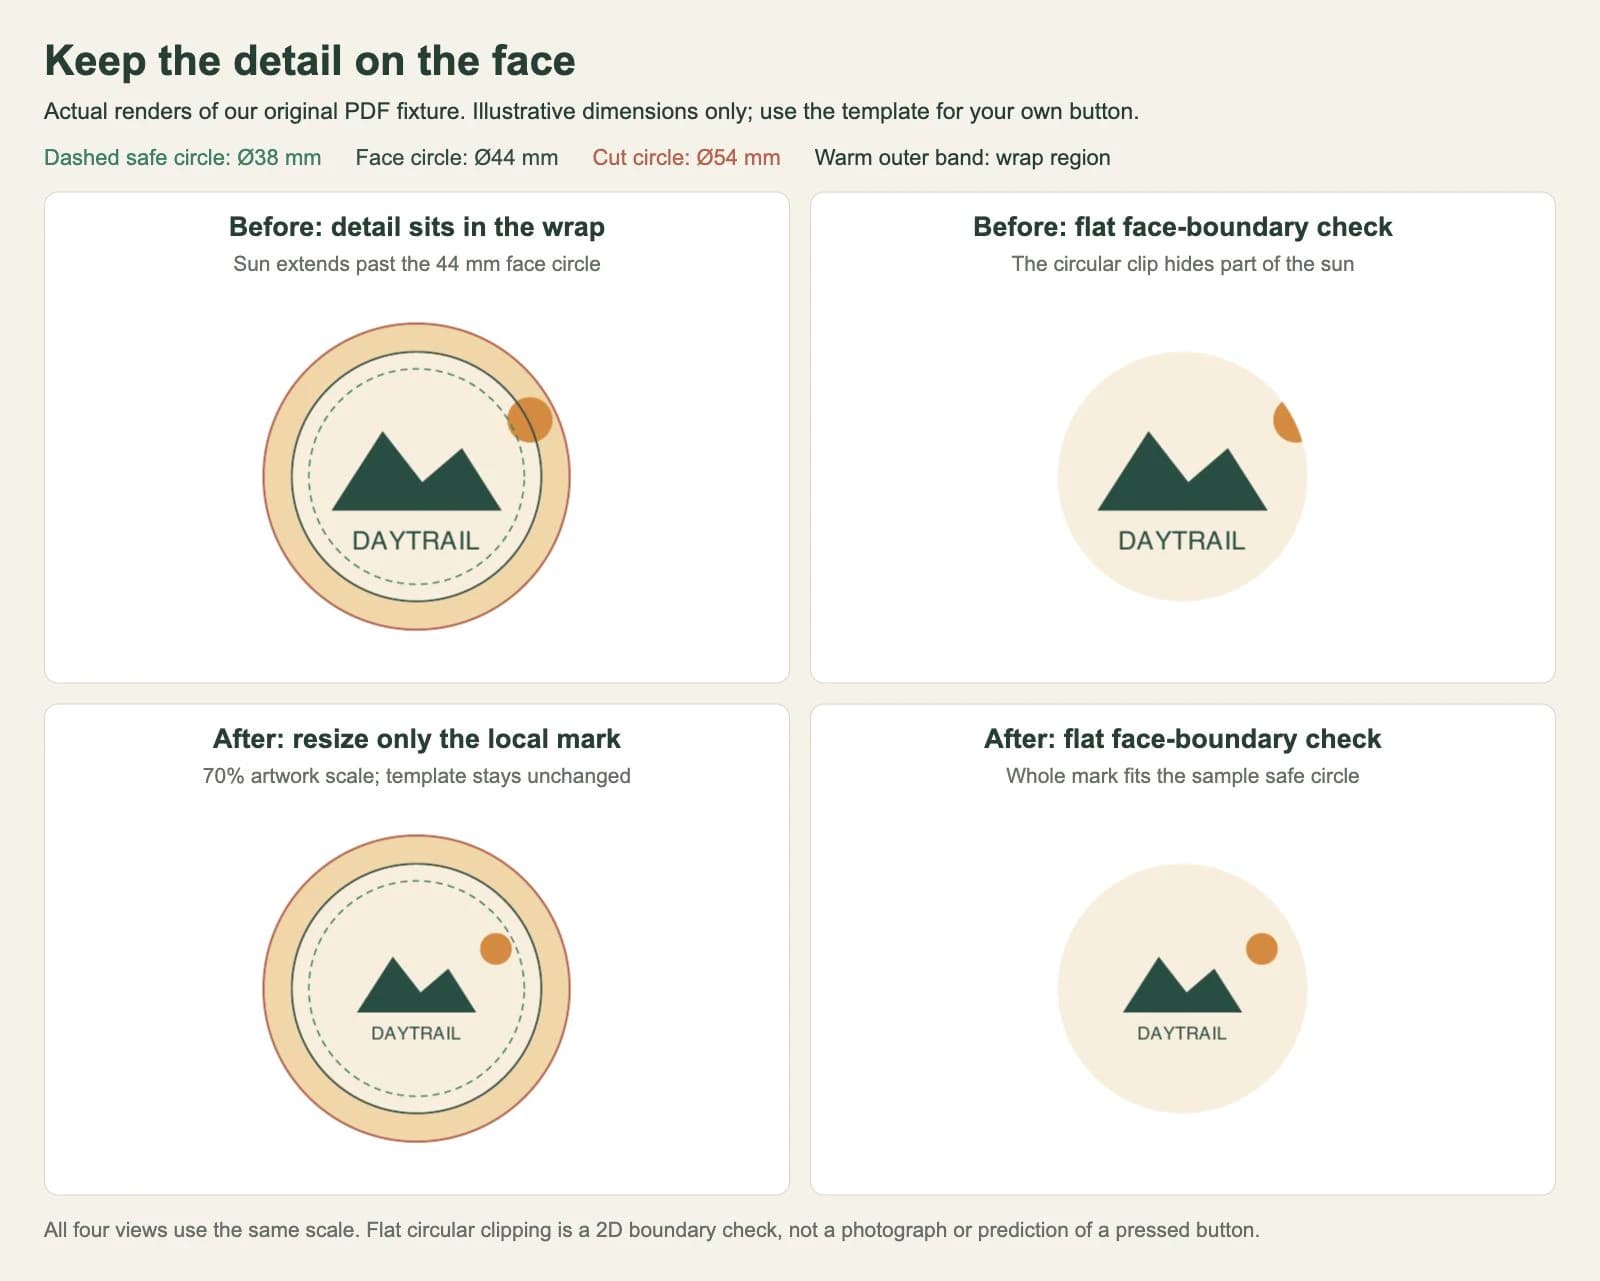
We rendered the original SVG/PDF fixture with a circular face clip to inspect that boundary. The clip hides part of the oversized sun. A real button curves and wraps, so this flat check does not predict exactly how much of the sun a person would see from an angle.
Resize the mark without resizing the template
For the corrected sample, we scaled only the complete emblem to 70% around the same center. The sun's outer radial extent became about 18.45 mm, which fits within our 19 mm safe radius. The mountain and lettering moved inward with it. The background and all template circles retained their original dimensions.
| What changed | Before | After |
|---|---|---|
| Local emblem scale | 100% | 70% |
| Sun's outer radial extent | About 26.36 mm | About 18.45 mm |
| Face diameter | 44 mm | 44 mm |
| Cut diameter | 54 mm | 54 mm |
The 70% value solves this authored example. For another mark, adjust its position, proportions within an approved lockup, detail or overall scale according to that artwork's constraints. Check the whole emblem, including small detached details and any required clear space.
Shrinking the entire sample file to 70% would reduce the 54 mm cut circle to 37.8 mm. That changes the production size rather than correcting the artwork's placement inside it. Keep the vendor's template geometry fixed while editing the artwork layer.
Method note: We inspected the original SVG circle radii and artwork transforms, checked the PDF's encoded dimensions and rendered all four views with Poppler 26.02.0. Each PDF page is 66 × 66 mm, with the same nominal guide dimensions. This is a digital measurement and rendering test. No paper print, physical pressing, readability study or supplier approval was performed.
Follow the maker's background instructions exactly
Do not assume that every button supplier wants color extending to the same outer line. Two current instructions show why:
- American Button Machines' template guide says to extend a full-color background to its cut line.
- Dr. Don's Print Lab separates image area, background area and cut line in its button artwork specifications. Its high-speed presses require a white gap between the specified background and cut line; it explicitly warns against filling that gap.
Those are instructions for different production setups. Use the one for your actual order or machine. Our shaded sample explains the regions; its filled outer band does not override a supplier's required white gap.
Keep proof masks, measurement guides and cut lines in the layers the supplier requests. A front-only preview can help check placement, but exporting that masked view as the complete artwork may omit the outer material needed for production. PureButtons instructs users to switch its proof layer off again to check the full bleed area.
Check the delivered artwork at its nominal size
Use this sequence on the first design before repeating it across a sheet:
- Get the current template for the selected product, size and production setup. Keep a master copy with its original dimensions and guide labels.
- Place the logo, text and background on the intended artwork layer. Keep critical details inside the supplied safe region; inspect detached dots, accents and thin features as well as the main shape.
- Review the front separately, then return to the full layout. Confirm that the background follows the maker's outer-area instructions.
- Reopen the exported delivery file. Compare the cut diameter, face or image-area guides and artwork placement with the unchanged template. If the cut circle changed size, correct the export scale before moving individual elements.
- Check the nominal-size print and, when making the buttons yourself, a pressed sample using the intended supplies. Confirm lettering, edge placement and background coverage before producing the batch.
American Button Machines' printable size-guide instructions say to print at 100% without fit-to-page scaling. That is its sizing check, not evidence that every printer or press will produce an accepted button. Measure your actual print and review the physical sample or the supplier's proof.
The digital placement check is complete when the exported template retains the required dimensions and the essential artwork remains within its intended region. If a physical sample still loses a detail, review the actual template, print scale, centering and production setup rather than treating the screen preview as final approval.
Choose vector or raster for the artwork you have
A button can use a photograph, painted illustration or flat logo. Preserve the source that suits the design. Dr. Don's accepted artwork guidance includes both vector and raster file types, so tracing is not an automatic prerequisite for a button order.
If the original vector logo exists, place that master in the template. Keep editable lettering in the working file and prepare the supplier's requested delivery copy. If only a raster logo remains and you need scalable shapes, PerfectVector's logo vectorizer can reconstruct an SVG candidate. Compare every meaningful detail with the source, then place the reviewed mark inside the button template and recheck its physical dimensions. Vectorization creates paths from pixels; it does not supply the press template, infer the brand's safe placement or verify a finished button. The vectorization primer explains the reconstruction step.
Our sample emblem was drawn directly as vector geometry. Its sun needed a layout correction, not tracing. A detailed photo may likewise need a better crop and placement while remaining raster artwork.
FAQ
Is the cut diameter the size of the visible button face? No. The paper piece includes material needed around the shell. Use the product template's face, image-area and safe-area guides for important content, and use its cut boundary for the paper piece.
Should all backgrounds extend to the cut line? Follow the maker's instructions. American Button Machines shows full-color backgrounds reaching its cut line, while Dr. Don's specified setup requires a white gap between the background and cut line. The requirement belongs to the actual production setup.
Can I shrink the whole template when my logo is too large? Keep the template at its required dimensions and adjust the artwork inside it. Shrinking the whole sample here to 70% would change its cut diameter from 54 mm to 37.8 mm.
Does vector artwork guarantee readable button text? No. Vector geometry preserves shapes through scaling, but the placed size, type design, spacing and production still determine readability. Check the nominal-size print and the finished sample or supplier proof.
Sources
- PureButtons: How to use its templates — Safety zone, rim-text and bleed regions, plus the front-only proof layer.
- American Button Machines: Button-making templates — Cut and print-area distinction, its background instructions and actual-size print check.
- Dr. Don's Print Lab: Artwork for buttons — Separate image, background and cut dimensions; its required white gap and accepted file types.
Need to recover a logo from a bitmap first? Create a vector logo candidate, inspect its small details, and place the reviewed mark into the correct button template before checking the print and proof.
More from the blog
Double-Sided Game Tokens: Match Front and Back
Match the fronts and backs of game tokens with a numbered sheet example. Check long-edge and short-edge layouts, readable symbols, and a separate paper proof.
Coloring Page Line Thickness: Check the Printed Size
Choose coloring-page line thickness at the final size. Compare stroke weights, preserve small coloring spaces, and check whether your SVG uses strokes or fills.