Prepare Vector Artwork for Enamel Pin Production
Turn a sketch, PNG, or logo into clear enamel-pin artwork, then verify metal lines, color regions, text, size, and the manufacturer's proof.
On this page
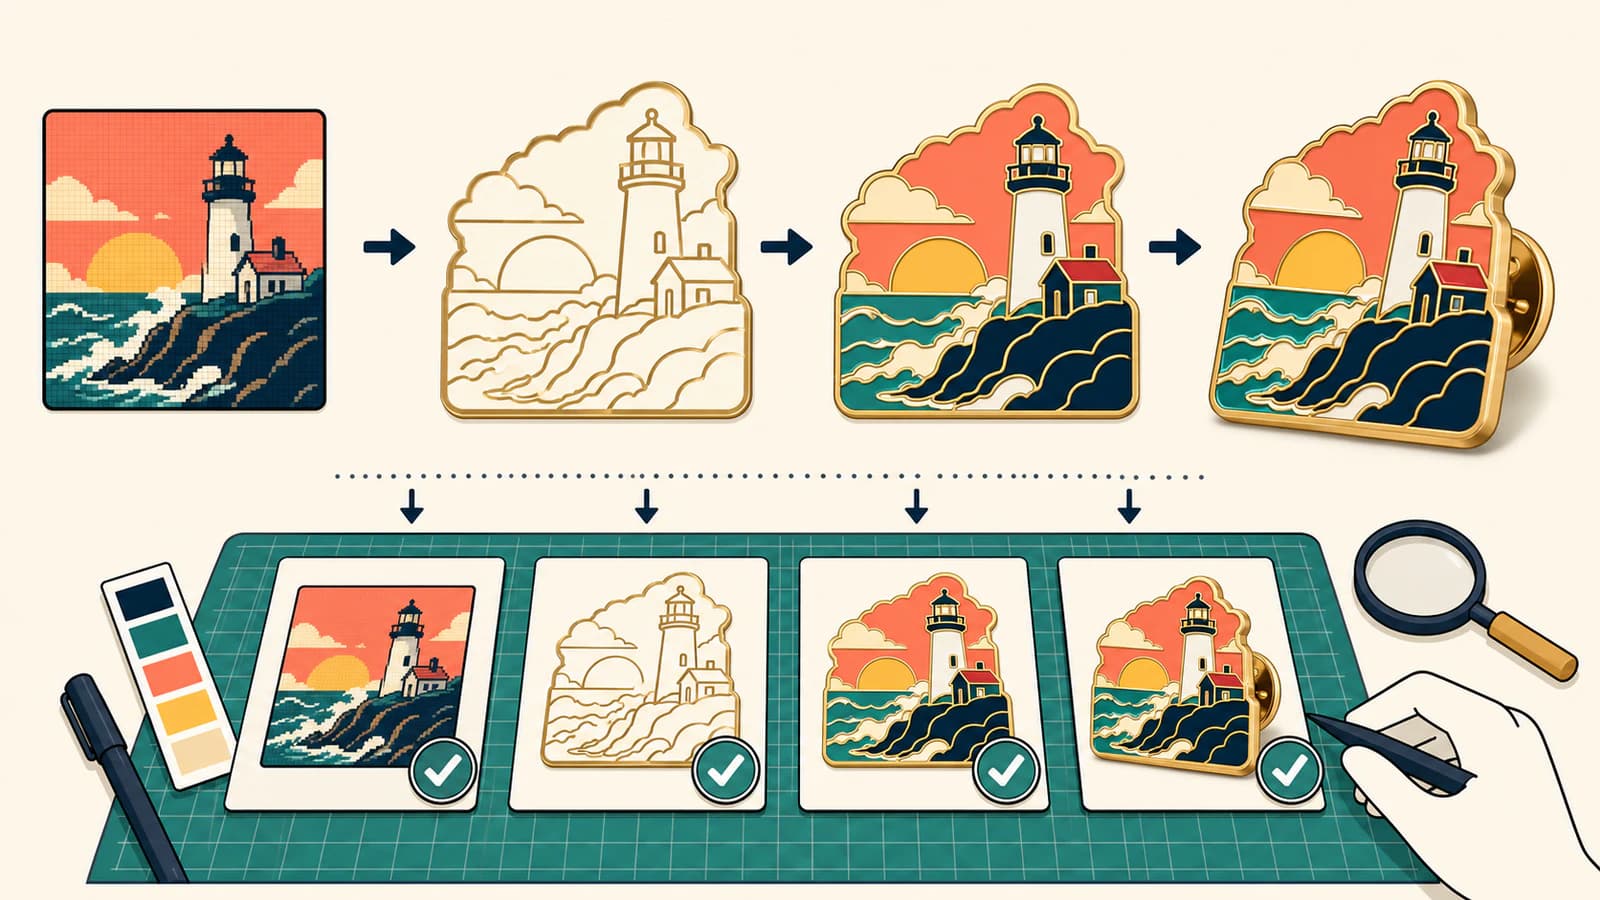
Good enamel-pin artwork is not just a small illustration saved as AI or SVG. It is a clear production map: an outside shape, metal boundaries, enamel regions, readable details, and enough information for a manufacturer to create an accurate proof.
Vector art helps because the shapes stay editable and measurable. It is not always an entry requirement. Pinform's current artwork guide accepts editable AI, EPS, SVG, and PDF files, but also accepts PNG, JPG, sketches, photos, and written direction. WizardPins likewise says that vector is ideal while its art team can work from other starting files. Ask your chosen manufacturer what it needs before rebuilding everything.
Prepare a pin map, not a generic SVG
- Choose the manufacturer and pin construction before locking technical limits.
- Test the design at the intended physical size.
- Make the outside silhouette unmistakable.
- Separate traditional enamel color regions with intentional metal boundaries.
- Replace unsupported gradients and tiny texture with solid, readable shapes.
- Outline or package type according to the manufacturer's instructions.
- Label colors, plating, dimensions, cutouts, and back details.
- Treat the approved production proof—not your upload—as the final manufacturing reference.
Ask for the factory specification first
There is no useful universal “enamel pin SVG” preset. The workable detail depends on the finished size, metal process, enamel type, plating, printed effects, and the factory's equipment.
One manufacturer illustrates why copy-pasted numbers are risky. WizardPins' designer-oriented setup guide gives its own minimums for metal lines, color-filled areas, and type. Those are useful examples for a WizardPins order, not a promise that every supplier uses the same limits. Request the current specification from the vendor that will make your pin.
Send these questions before final cleanup:
- Which constructions fit this artwork: soft enamel, hard enamel, printed, die struck, or another method?
- Which editable and reference formats do you accept?
- What are your minimum metal-line, enamel-area, gap, cutout, and text sizes at the final pin dimensions?
- How should colors, plating, screen printing, translucent enamel, glow, or other effects be marked?
- Should fonts be outlined, included separately, or both?
The answers define the vector file you actually need.
Decide what the pin is made of
Traditional soft- and hard-enamel designs are built around metal and filled color areas. The metal is not merely an outline style added at the end; it separates enamel regions and contributes to the visible design. WizardPins' guide describes line art in which dark lines represent metal and open areas represent enamel cavities. Pinform similarly advises clear silhouettes, room around lettering, and separated important colors.
That makes a painterly image a design reference, not a literal mold plan. Gradients, blur, translucent edges, hairline details, and textured brushes may need to become solid regions, printed details, or intentional omissions. Do not simplify blindly. Decide what must survive:
- the recognizable outside contour;
- the main face, symbol, lettering, or focal object;
- critical negative spaces and cutouts;
- a small set of purposeful color regions;
- metal that separates those regions without swallowing them;
- attachment, backstamp, and orientation notes when required.
Printed pins and add-on processes can support details that a classic filled-enamel construction cannot. Ask the manufacturer whether a printed detail is appropriate rather than assuming every gradient must be recreated in metal and enamel.
Convert the source into intentional shapes
Start from the cleanest original. Look for an existing AI, EPS, SVG, or vector PDF before tracing a screenshot. If only a raster remains, use the largest, least-compressed version.
For a flat logo, use the logo vectorization guide to choose between automatic tracing and a redraw. If tracing is the right route, PerfectVector's enamel pin artwork converter can rebuild the visible regions in a logo, badge, icon, or limited-color drawing as editable vector shapes. Compare the result with the source before using it as production art. Automatic reconstruction cannot recover an original font, hidden geometry, named spot colors, or the artist's intended metal structure.
Clean the trace with the future pin in mind:
- Fix the silhouette. Remove edge noise and make every deliberate notch or cutout readable.
- Reduce incidental colors. Compression halos and antialiasing should not become extra enamel regions.
- Close intended regions. Open contours can make it unclear where enamel or metal belongs.
- Simplify nodes. Keep curves smooth, but do not distort recognizable geometry. Use the vector trace quality scorecard for a structured review.
- Separate production meaning. Keep the outer cut, metal artwork, color regions, printed details, and reference notes distinguishable in the file or proof.
- Rebuild type when accuracy matters. A trace of small letters often preserves pixel damage. Use the correct font, then follow the vendor's outlining rule.
Do not chase a perfectly faithful trace of material that the process cannot reproduce. The goal is a pin-ready interpretation, not maximum path count.
Check the design at physical size
Zooming to 800% can make fragile detail feel comfortable. Place the artwork at the intended pin dimensions and view or print it at 100%. Check whether the silhouette reads first, whether letters remain distinct, and whether small color islands still look intentional.
If something fails, the options are not limited to deleting it. You can enlarge the pin, shorten the wording, widen a metal bridge, combine similar regions, or ask whether the detail can be printed. Make that decision with the manufacturer because construction changes the answer.
Keep a full-size working master and avoid rounding or resizing it repeatedly. Include the final dimensions in the handoff rather than relying on the document's canvas size alone.
Label the production intent
A clean file can still be ambiguous. Add a reference page or non-production layer showing:
- final width and height;
- pin type and plating choice;
- color labels using the system your vendor requests;
- areas that are raised metal, recessed enamel, printed, transparent, or cut out;
- front and back views when relevant;
- attachment position and orientation;
- any acceptable simplification and any detail that must not change.
GS-JJ's current pin-artwork guide says it accepts several vector and high-resolution raster formats and sends a design draft for confirmation before production. That is a useful distinction: the upload begins the technical conversation. It does not replace the factory proof.
Review the proof as a new file
The proof may deliberately differ from your illustration. A manufacturer may widen metal, enlarge letters, remove a tiny island, change a color boundary, or recommend a different construction so the pin can be made reliably.
Before approval, compare the proof against both the editable art and a simple reference image. Verify:
- outside shape, size, and orientation;
- every word and punctuation mark;
- metal color and all metal boundaries;
- enamel colors and which regions they fill;
- cutouts, printed details, attachments, and backstamp;
- changes the art team made during simplification;
- front and back views, if supplied.
Pinform describes the approved proof as the shared production reference covering shape, metal, colors, wording, dimensions, and direction. Approve it only when those decisions are explicit. If your artwork and proof disagree, request a revision rather than assuming production will follow the original file.
FAQ
Do enamel pin manufacturers require vector artwork? Not always. Several manufacturers prefer editable vector files because they speed up accurate proofing, but some accept PNG, JPG, sketches, photos, or written ideas and prepare the production art themselves. Follow the selected manufacturer's current submission rules.
Can I submit a PNG for an enamel pin? Often, yes. Send the largest, clearest PNG you have, plus dimensions, colors, plating, and notes. Expect the manufacturer or a designer to simplify or redraw it before production, and review that proof carefully.
Can enamel pins use gradients? Traditional filled-enamel regions generally use solid colors separated by metal, so ordinary gradients and soft shading do not translate directly. Some printed or specialty processes may reproduce them. Ask the manufacturer which construction fits the effect.
How thick should enamel pin lines be? Use the minimum specified by the manufacturer for the chosen size and process. Published numbers from one vendor are examples, not a universal standard.
Should I convert text to outlines? Many production workflows request outlined text so fonts cannot be substituted. Keep an editable master with live type, and outline a delivery copy only after wording and spelling are final and the manufacturer confirms the requirement.
Sources
- Pinform — Enamel pin artwork guide — Accepted starting files, design principles, construction choices, and proof approval.
- WizardPins — Enamel pin guide — Raster and vector submissions, metal-and-enamel line art, color selection, and digital mock-ups.
- WizardPins — How to design enamel pins — One manufacturer's designer-facing artwork limits and preferred files.
- GS-JJ — Custom pin artwork guide — Accepted file tiers, vector cleanup, and pre-production design confirmation.
Starting from a flat logo or illustration? Prepare editable enamel pin artwork, simplify the result for your chosen construction, and send both the vector file and a reference image for proofing.
More from the blog
What File Format Should a Logo Be? A Practical Guide
Which logo file format for web, print, embroidery, or a vendor request, in one decision table, plus how to recover a vector master when all you have is a PNG.

Logo Clear Space: Calculate and Preserve the Margin
Choose a clear-space unit for your logo, calculate the full exclusion zone, and preserve it in an SVG without confusing artwork size with the padded canvas.