
Inkscape Command Line Export: Page, Drawing, or Object
Choose page, drawing, or object bounds for Inkscape command-line PNG exports. Compare actual outputs, make two sizes, and keep your original SVG master intact.
On this page
For an Inkscape command-line PNG export, choose the area first: --export-area-page keeps the page frame, --export-area-drawing fits the drawing, and --export-id targets an object's bounds. Add --export-id-only when the output should show only that object. The Inkscape command-line guide distinguishes an object crop from hiding the other objects.
Then set the output width, transparency, and filename explicitly. Those choices make a small delivery batch easier to inspect and repeat.
What changed in our test exports
We made a 600 × 360 SVG with two named objects: a green badge and a coral swatch that overlaps its right edge. The page includes generous empty space. The combined drawing bounds are 400 × 180 units; the badge alone is 180 × 180.
We exported the source with the official Inkscape 1.4.4 macOS arm64 application, using its command-line executable. All four exports below request a width of 600 pixels and a transparent background.
| Export choice | Output in this test | Visible content |
|---|---|---|
| Page area | 600 × 360 PNG | Both objects with the page padding. |
| Drawing area | 600 × 270 PNG | Both objects in a tighter crop. |
| Badge ID | 600 × 600 PNG | The badge plus part of the overlapping swatch. |
Badge ID with --export-id-only | 600 × 600 PNG | Only the badge. |
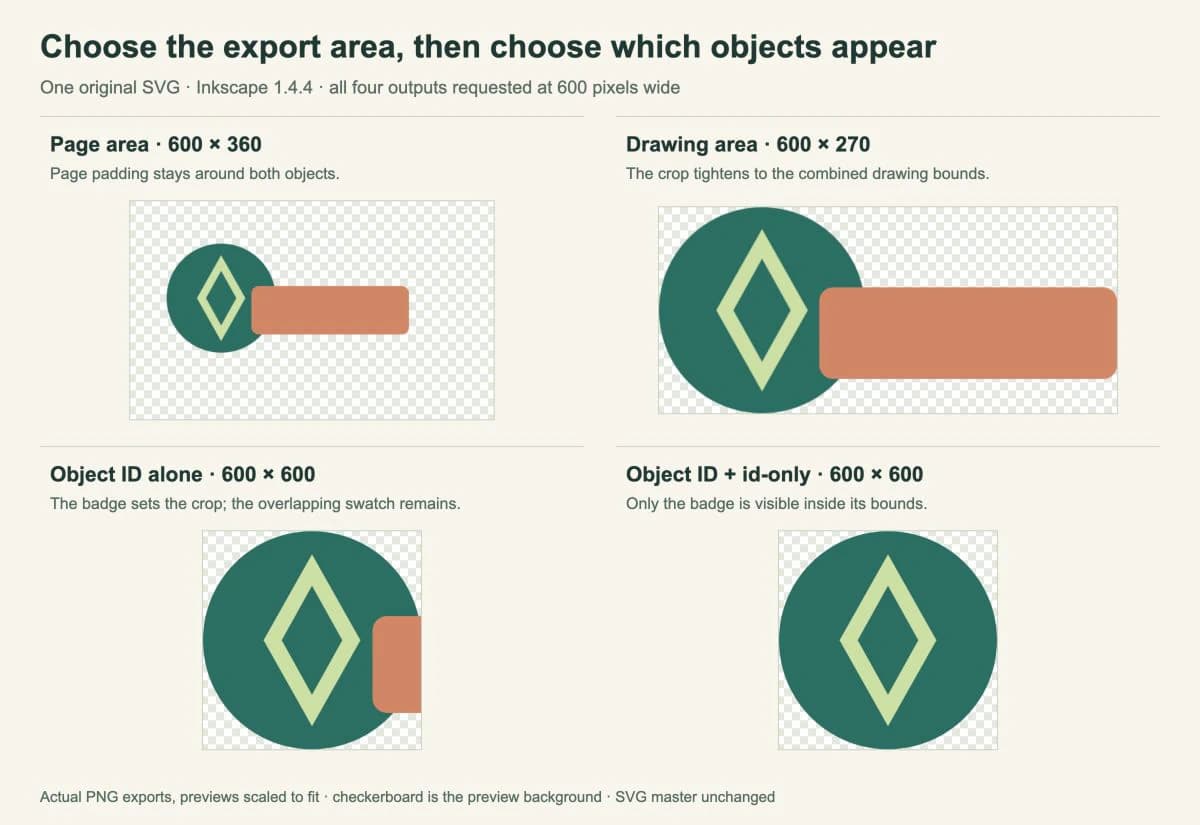
The isolated object is much larger inside its PNG because we still requested 600 pixels across its narrower bounds. A consistent output width does not imply a consistent artwork scale when the export area changes.
These examples use a single-page SVG with ordinary shapes. They do not test multi-page selection, filters, or linked images.
Create a source with stable object IDs
Save the following as master.svg. The group ID badge lets the command export its circle and paths together. The second object, swatch, deliberately crosses the badge's bounds.
<svg xmlns="http://www.w3.org/2000/svg"
     width="600" height="360" viewBox="0 0 600 360">
  <g id="badge">
    <circle cx="150" cy="160" r="90" fill="#236f62"/>
    <path d="M150 89L190 160L150 231L110 160Z" fill="#cde0a4"/>
    <path d="M150 115L175 160L150 205L125 160Z" fill="#236f62"/>
  </g>
  <rect id="swatch" x="200" y="140" width="260" height="80"
        rx="12" fill="#d68462"/>
</svg>
For an existing design, inspect the SVG's IDs before scripting exports. An object name displayed by an editor may differ from the XML id used by the command. Our SVG editing guide explains how to inspect and change the markup while keeping a backup.
Export the page, drawing, and isolated badge
The commands below use Bash or Zsh syntax. Run them from the folder containing master.svg. First point a shell variable at your Inkscape executable:
inkscape_bin=inkscape
mkdir -p exports
That setting assumes inkscape is available on your PATH. For a normal macOS application install, the value can instead be /Applications/Inkscape.app/Contents/MacOS/inkscape. Quote the path when assigning it if your location contains spaces.
For the whole page:
"$inkscape_bin" --batch-process master.svg \
  --export-type=png --export-area-page \
  --export-width=600 --export-background-opacity=0 \
  --export-filename=exports/page.png
For a crop around the drawing:
"$inkscape_bin" --batch-process master.svg \
  --export-type=png --export-area-drawing \
  --export-width=600 --export-background-opacity=0 \
  --export-filename=exports/drawing.png
For the badge by itself:
"$inkscape_bin" --batch-process master.svg \
  --export-type=png --export-id=badge --export-id-only \
  --export-width=600 --export-background-opacity=0 \
  --export-filename=exports/badge.png
To reproduce the overlap control in the figure, remove --export-id-only from the last command and change the output name. The coral swatch then appears inside the badge's crop. Selecting the crop by ID does not, on its own, isolate the artwork.
The Inkscape manual documents these flags. --export-width sets the bitmap width in pixels and overrides the DPI setting. The export's aspect ratio determines the corresponding height. We use one area choice per command and an explicit .png output path.
We included --batch-process in the tested commands. In this macOS run, an export without it wrote a PNG but left the process running; the commands above completed normally. The flag is separate from the shell loop that requests multiple sizes.
Make two sizes without changing the master
For a pair of page-framed PNGs, repeat the same scope settings and change only the width and output name:
for export_width in 240 480; do
  "$inkscape_bin" --batch-process master.svg \
    --export-type=png --export-area-page \
    --export-background-opacity=0 \
    --export-width="$export_width" \
    --export-filename="exports/page-${export_width}.png" || exit 1
done
Our run produced 240 × 144 and 480 × 288 PNGs. Both retained the same page framing and transparent background. The SHA-256 hash of master.svg matched before and after the exports, so the source bytes were unchanged in this test.
Use output names that identify the source, area, and size when you expand this to a larger job. Keep the commands in a script alongside the source files so you can reproduce the choices later. Check the first outputs before running a large folder of artwork.
Check the files before delivery
Inspect both the dimensions and the visible content. A successful command can still export the wrong crop, an unwanted overlap, or more padding than you intended.
- Large empty margins: compare page and drawing exports. Pick the frame that the destination expects.
- Another object appears in an ID crop: check whether you need
--export-id-only. - Transparency looks white in a viewer: open the PNG over a contrasting background. A white background object in the source is artwork and remains visible even when the export background is transparent.
- The artwork appears larger between outputs: compare the export area as well as the pixel width.
The Inkscape PNG export guide explains the page, drawing, selection, and background concepts behind these choices. A PNG is a raster delivery file, so retain the SVG for editing. See the SVG file guide if you need to check what the source actually contains.
If you are comparing a different automation route, our Sharp SVG-to-PNG guide covers that library's renderer and sizing workflow. Its API options do not transfer directly to Inkscape.
If the source artwork exists only in a PNG or JPG, PerfectVector's image vectorizer can prepare editable vector artwork before this export stage. Inspect the recovered paths in an editor, then choose the page frame and object IDs. Inkscape's Trace Bitmap workflow is another preparation route. An SVG that already contains the paths you need can go straight to export.
FAQ
Why are page and drawing exports different sizes? Their bounds can have different aspect ratios. In our test, both requested 600 pixels of width, but the 600-by-360 page produced a taller PNG than the 400-by-180 drawing bounds.
Why does export-id still include another object? It chooses the target object's export bounds. Other artwork crossing those bounds can remain visible. Add export-id-only when you want to hide the other objects.
Does this PNG batch overwrite the SVG source? The shown commands read master.svg and write separately named PNGs. Our source hash was unchanged after the test. Keep the master and the delivery files separately, and inspect any additional editing or save actions before adding them to the script.
Sources
- Inkscape Wiki — Using the Command Line — Export workflows and the difference between an object crop and isolated-object output.
- Inkscape — Command-line manual — Area, object, size, background, and output options.
- Inkscape Beginners' Guide — Exporting a PNG File — Export-area and transparency concepts.
If your artwork still needs vector paths, vectorize the image and inspect the result first. Then save the SVG master, choose one export scope, and verify the first PNG's crop and dimensions before repeating the batch.
More from the blog

Inkscape Pattern Along Path: Build a Border from a Motif
Repeat a leaf motif with Inkscape's Pattern Along Path effect. Choose copy settings, handle distortion, keep an editable master, and check the final SVG.
SVG Pattern Units: Keep Repeated Motifs the Right Size
Control SVG pattern spacing and motif size with patternUnits, patternContentUnits, and viewBox. Compare resizing a shape with scaling its entire group.