
SVG Dotted Outlines: Control Dash Spacing and Round Caps
Make dotted SVG borders with round caps, calculate visible gaps, and fix a closed outline's uneven seam using an original badge and editable stroke examples.
On this page
For a dotted SVG outline, give the shape a stroke, set stroke-linecap="round", and use a zero-length dash followed by a positive gap, such as stroke-dasharray="0 20". The stroke width controls the dot diameter. The second dash-array number controls the distance along the path between dot centers; it is not the empty space between their visible edges.
That distinction matters when a border looks crowded after you round its caps. A closed badge adds another problem: the repeat may reach the starting point with a shorter leftover interval. The examples below separate cap shape, visible spacing, and the closing seam so you can adjust the right value.
These are decorative stroke settings. They do not create a new offset contour or turn each painted dot into a separate cutting path.
Compare butt caps, round caps, and dots
stroke-dasharray alternates painted dash lengths and unpainted gap lengths. A two-number list makes that repeat easy to inspect. The MDN dash-array reference also explains how an odd-length list repeats to form an even-length sequence.
Copy this standalone SVG into a file and open it in a browser. Each original path is 240 units long, with a stroke width of 8:
<svg xmlns="http://www.w3.org/2000/svg" width="420" height="300" viewBox="0 0 420 300">
 <g fill="none" stroke="#147d78" stroke-width="8">
  <path d="M40 55H280" stroke-dasharray="12 20" stroke-linecap="butt" />
  <path d="M40 145H280" stroke-dasharray="12 20" stroke-linecap="round" />
  <path d="M40 235H280" stroke-dasharray="0 20" stroke-linecap="round" />
 </g>
</svg>
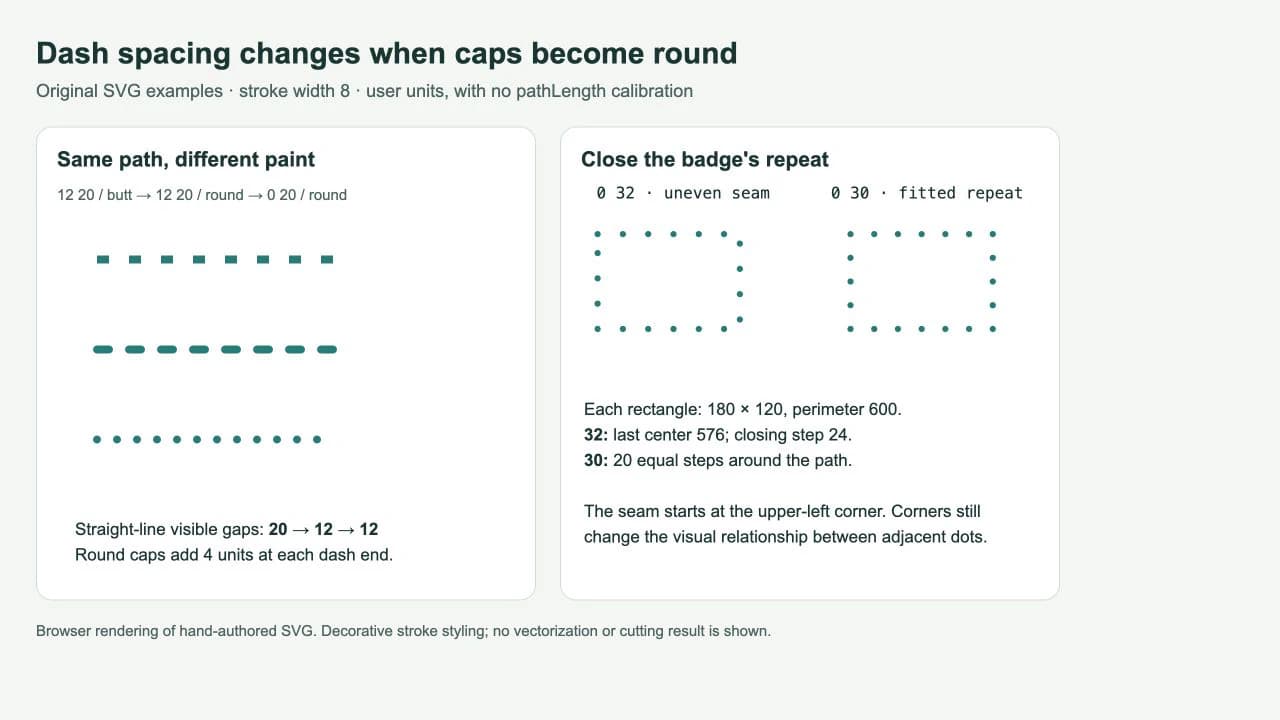
The first row uses 12 20 with butt caps. Its complete dashes occupy 12 units, leaving 20 units of visible space. The second row uses the same numbers with round caps. Each cap reaches 4 units beyond the underlying dash endpoint, so a complete dash occupies 20 units and the visible gap shrinks to 12.
The third row changes the dash length to zero. Round caps make dots with diameter 8 and centers 20 units apart on this straight path. Their visible edge-to-edge gap is 12 units. W3C's SVG painting rules define caps on dash ends, including the treatment of zero-length dashes; MDN's cap reference explains the cap geometry.
For complete, separated dashes on a straight segment with no distance calibration or transform, the useful calculations are:
- Butt cap: visible dash length =
dash; visible gap =gap. - Round cap: visible dash length =
dash + stroke-width; visible gap =gap - stroke-width. - Round dot: diameter =
stroke-width; center spacing =gap; visible gap =gap - stroke-width.
If the last calculation is zero or negative, the dots touch or overlap. At bends, the distance along the path differs from the direct distance between dots. Inspect corners and curves rather than applying the straight-line gap calculation to the entire outline.
Fit the repeat around a closed badge
The following rectangular badge paths each measure 180 by 120 units. Their perimeter is 2 × (180 + 120) = 600. The path starts at the upper-left corner and runs clockwise.
<svg xmlns="http://www.w3.org/2000/svg" width="620" height="230" viewBox="0 0 620 230">
  <g fill="none" stroke="#147d78" stroke-width="8" stroke-linecap="round">
    <path d="M40 40H220V160H40Z" stroke-dasharray="0 32" />
    <path d="M360 40H540V160H360Z" stroke-dasharray="0 30" />
  </g>
</svg>
On the left, 0 32 places dot centers at path distances 0, 32, 64, and so on through 576. Only 24 units remain before the path returns to its start. The closing interval is shorter than the other 32-unit intervals, so the seam is uneven. Increasing the SVG's display size magnifies that mismatch without solving it.
On the right, 0 30 divides the perimeter into 20 equal intervals. In this particular rectangle, both side lengths also divide by 30, so the corners align with dots. Along each straight side the 8-unit dots leave 22 units of visible space. This fixes the chosen badge's repeat; it is not a promise of identical visual spacing on every curved outline.
For your own outline, choose a desired dot count and divide the path's perimeter by that count to obtain a starting repeat distance. Then check the actual rendered result, especially bends, small details, and the closing point. A shape with multiple disconnected subpaths needs separate attention because the dash pattern starts again for each subpath, as the SVG painting specification describes.
stroke-dashoffset moves the pattern's starting position along the path. It can place a conspicuous seam somewhere less noticeable, but it does not make a 32-unit repeat divide 600. Use a fitted repeat when consistent closure is the goal. The MDN dash-offset reference documents that phase adjustment.
We opened both standalone SVG files independently and checked their browser rendering against this comparison. The examples use unitless values, no pathLength calibration, no transforms, and no external CSS. They demonstrate these hand-authored paths, not a PerfectVector conversion or a cross-application compatibility test.
Keep sizing and paint settings consistent
Start with numeric values in the SVG's own coordinates, as above. Do not swap in percentages and assume they represent the same fraction of the path perimeter. The dash-array reference describes percentage resolution against the viewport rather than the path length.
If you use pathLength to normalize distances, calculate the dash pattern in that calibrated distance system. Avoid mixing the uncalibrated perimeter from this example with normalized dash values from another snippet. The SVG stroke-animation guide shows a separate use of native path-length calibration for a drawing reveal.
Set fill="none" when you want only the border. A fill can remain visible even when part of the stroke is dashed. If the expected dots disappear, confirm that the element has a visible stroke and that a CSS rule has not overridden its presentation attributes. The missing-stroke checklist covers those checks before you start changing spacing.
Leave enough room around the geometry for its stroke. An 8-unit stroke extends beyond the path, and round caps extend beyond open ends. The example includes margins so its dots are not clipped by the viewport. Test your delivered SVG at the actual display size; tiny dots that look distinct in an enlarged preview may be difficult to see in an icon.
Separate artwork preparation from border design
If the motif inside a badge exists only as a PNG or JPG, PerfectVector's image-to-vector workflow can prepare editable SVG artwork for that motif. Compare the silhouette, small openings, and separate regions with the original image before placing it inside your border. Keep the decorative outline as a separate shape so its stroke width and dot spacing can be changed independently.
Keep an existing vector master when available. A rectangle or other simple border is usually straightforward to draw directly in an editor. Vectorization does not automatically design an offset border, recover a single centerline, or choose dash spacing. If a traced thick mark has two boundaries, the single-line SVG guide explains why that differs from one drawing route.
For a cutting workflow, do not assume the machine will interpret decorative stroke paint as individual dot-shaped cuts. Prepare the intended geometry in an editor and inspect the destination application's preview. This article tests browser paint, not cutter behavior. The blog's editing guides cover related file preparation decisions.
Check the final outline
Before accepting the file, inspect the short open path and closed border separately. Confirm the cap style, stroke width, and repeat numbers; then inspect the first and last marks on the open path and the join around the closed path. Check tight curves at the size the artwork will be used.
Reopen the saved SVG in its intended destination. If you need editable decorative paint, retain the stroke properties. If the destination needs permanent contours, perform and verify that conversion as a separate editing step. Keep an editable source copy so you can revise the spacing later.
FAQ
Why do my dashes look closer after I choose round caps? Round caps extend beyond both dash ends. On a straight segment, the visible gap between complete dashes is the specified gap minus the stroke width, provided the marks remain separated.
How do I make round dots instead of short pills? Use a zero-length dash, a positive gap, and round caps. For example, a stroke width of 8 with stroke-dasharray="0 20" produces 8-unit dots with centers 20 units apart on a straight path.
Why is one gap different around a closed outline? The repeat may not divide the perimeter evenly. Fit the repeat to the path length, then inspect the closing point and corners. Moving the dash offset changes the pattern's phase but does not fix the arithmetic mismatch.
Sources
- MDN — stroke-dasharray — defines the alternating dash and gap list and its value handling.
- MDN — stroke-linecap — explains butt and round cap geometry and zero-length behavior.
- W3C — SVG painting — specifies dash painting, cap treatment, and pattern handling on subpaths.
- MDN — stroke-dashoffset — defines the offset used to shift a dash pattern.
If your badge's motif starts as a raster image, prepare an SVG candidate with PerfectVector, inspect its contours and openings, and add the dotted border as a separate editable shape.
More from the blog
SVG Paint Order: Keep Thick Outlines Behind Lettering
Use SVG paint-order to put a thick stroke behind the fill. Compare real text and path renders, check small sizes, and keep an editable master for delivery.

Penpot SVG Import: Get Editable Shapes Into Your Design
Import SVGs into the Penpot canvas, check individual fills and paths, and diagnose missing artwork or uneditable text before adding icons to your design kit.