SignMaster Image Vectorization: Get Cleaner Cut Paths
Prepare a bitmap, tune SignMaster's trace, inspect contours and nodes, and decide when a cleaner imported SVG is the better route for cutting.
On this page
- First decide what the machine should cut
- Prepare the bitmap before SignMaster traces it
- Trace for useful geometry, not maximum detail
- Audit the contours before cutting
- Remove duplicate and doubled edges
- Close shapes that should be closed
- Preserve intentional holes
- Delete specks and impossible islands
- Confirm size and color separation
- A vector is not automatically a print-and-cut contour
- When to import a cleaner SVG instead
- Run one representative test cut
- FAQ
- Sources
SignMaster can vectorize a bitmap, but pressing Trace is only the middle of the job. A dependable cut file starts with a suitable image, uses restrained trace settings, and survives a geometry check and a representative material test.
SignMaster's current Trace Tools page says its Vectorizer accepts common bitmap formats and includes preparation and correction tools such as color reduction or replacement, Flood Fill, Paint, and Magic Brush. Its Trace Options page says tracing options can be changed and reapplied before the result is loaded back into SignMaster. Use that loop. The first output is a draft, not a verdict.
The clean-cut workflow
- Start with the largest, sharpest, least-compressed source.
- Use ordinary tracing for flat logos, silhouettes, lettering references, and limited-color art—not photographs that need continuous tone.
- Remove the background, compression specks, shadows, and accidental colors before tracing.
- Retune the trace until the important shapes are smooth without creating a thicket of nodes.
- Inspect outlines or wireframe geometry for open paths, duplicates, holes, tiny islands, and doubled edges.
- Distinguish vector artwork from an assigned contour-cut operation.
- Test the smallest important detail on the real material before a production run.
First decide what the machine should cut
“Vectorize this image” can describe two different jobs:
- Cut the artwork itself. A one-color decal, stencil, or heat-transfer design needs paths around the shapes that will remain.
- Print the image and cut around it. A printed sticker or decal usually needs one deliberate contour around the outside, not paths around every visible color and detail.
Do not use a detailed color trace when the actual job needs one outer contour. Conversely, an outer contour is not enough when separate vinyl colors must be cut and assembled.
A photo is another fork. Ordinary fill tracing converts tones into many shapes; that may create a posterized illustration but rarely a sensible vinyl-cut design. If you intend a specialized line or strip effect, SignMaster advertises a separate ImageCut module for turning photos or graphics into horizontal or vertical cuttable parts. Check whether that module and effect match your license and job. It is not the same as tracing a logo into ordinary filled paths.
Prepare the bitmap before SignMaster traces it
Tracing follows visible pixel decisions, including bad ones. A tiny JPEG can contain soft edges, ringing, color halos, and isolated specks that become additional contours.
Prepare the source with these priorities:
- Use the best original. Find a larger PNG, a scan made at useful resolution, or an old vector master before tracing a thumbnail.
- Crop the work area. Empty canvas and scanner marks add nothing.
- Make the background unambiguous. Remove it or turn it into a single intentional color.
- Reduce accidental colors. A nominally three-color logo should not enter the trace with dozens of JPEG edge colors.
- Repair the silhouette. Close visible gaps that should be solid and remove dust that should not be cut.
- Choose the production version. Simplify gradients and texture for cut vinyl instead of asking a blade to imitate print.
SignMaster's official feature description specifically places image correction before vectorization. That is often a better use of time than deleting hundreds of unwanted nodes after an over-detailed trace.
Trace for useful geometry, not maximum detail
Use the Vectorizer controls available in your SignMaster version and edition. Product names, interface labels, and module availability can differ, so check the current product page and your installed help rather than following an old video pixel for pixel. SignMaster's current product overview distinguishes several editions and says its ART edition includes features from lower tiers plus additional modules.
The right trace has enough precision to preserve the intended corners and curves, but not so much that it copies every stair-step. Reapply the trace while you compare:
- outer silhouette;
- internal holes and counters in letters;
- corners that must stay sharp;
- smooth arcs that should not wobble;
- the number of color regions;
- small features that must survive weeding;
- overall node density.
If more precision adds many points without making the cut shape meaningfully closer, step back. A smooth-looking filled preview can hide messy contours, so inspect the underlying paths.
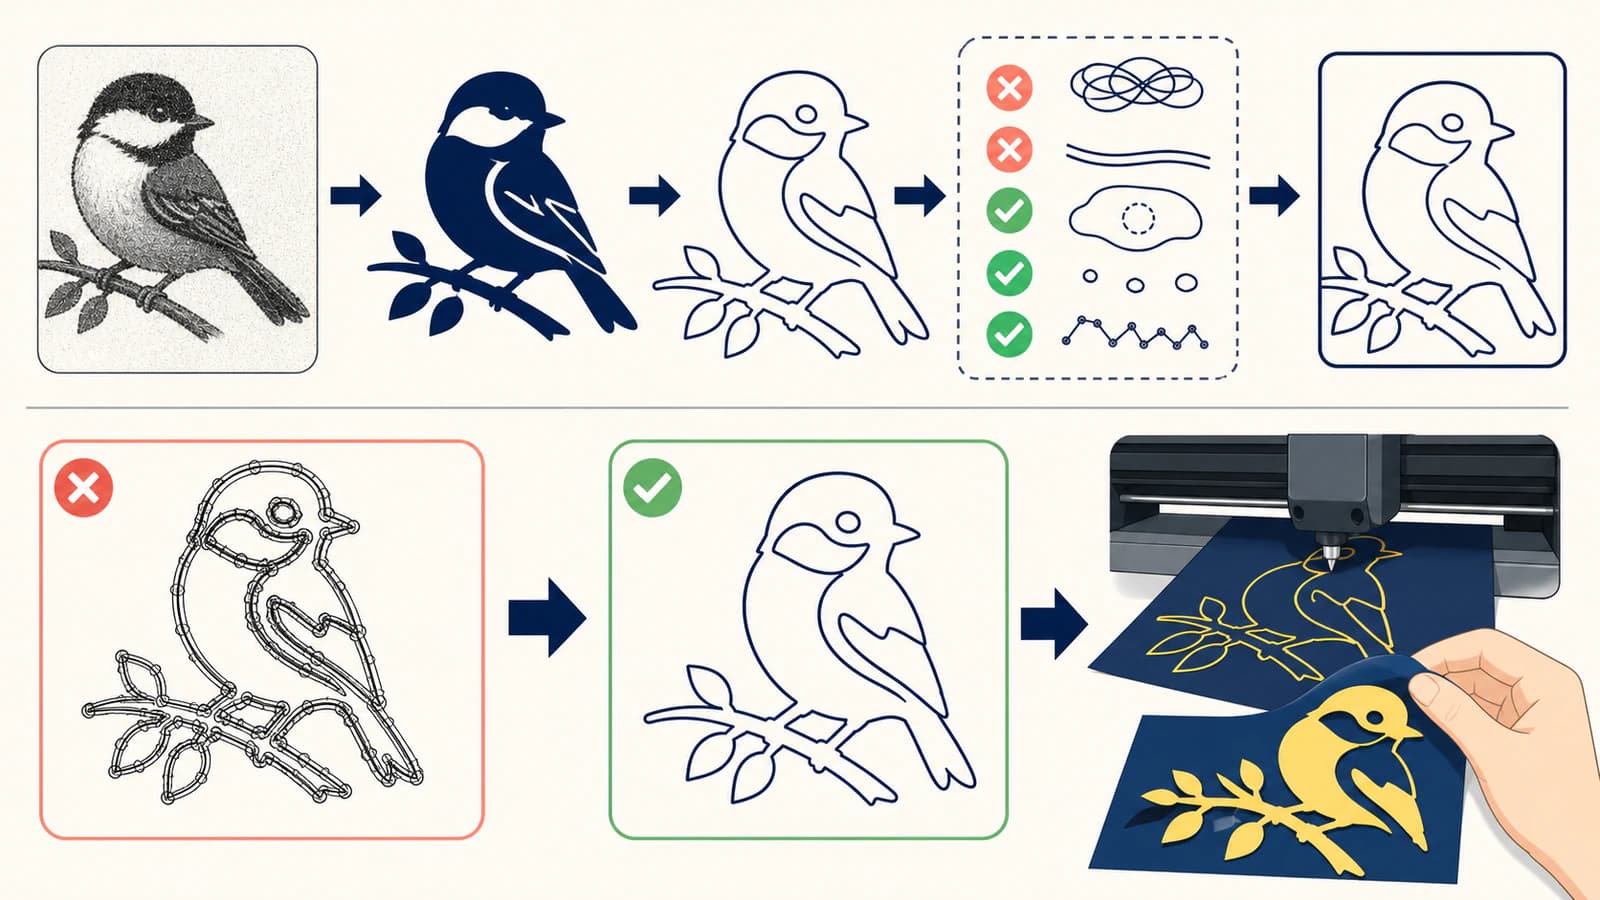
Audit the contours before cutting
Switch to the view that exposes outlines, nodes, or wireframe geometry in your installed version. Then inspect the file as a route the blade will follow.
Remove duplicate and doubled edges
Two contours on top of each other can make the blade revisit the same line. Thick raster strokes may also create the double-line tracing problem when you expected one centerline. Decide whether the production shape should be a filled band, one boundary, or a single open scoring path.
Close shapes that should be closed
A fill preview may look normal even when a contour contains a gap. Check joins, especially where low-resolution pixels or repaired artwork meet.
Preserve intentional holes
Letter counters and negative spaces can disappear if adjacent shapes merge. Inspect letters such as A, B, D, O, P, and R, plus holes inside icons and badges.
Delete specks and impossible islands
Every small isolated contour may become another cut and another piece to weed or place. Remove artifacts and simplify legitimate details that are too small for the material, blade, and finished size.
Confirm size and color separation
Set the final physical dimensions before judging detail. For multi-color vinyl, verify that each color's shapes are intentional and align as planned. The pre-cut SVG checklist is useful even when the trace was created inside SignMaster.
A vector is not automatically a print-and-cut contour
An imported or traced vector provides paths, but the software still needs to know which path is the actual contour-cut instruction. The current Skycut-with-SignMaster user manual says vector files can be imported in formats including AI, DXF, EPS, PDF, PLT, and SVG, while also warning that vector images are not applied as contour cuts until that operation is assigned.
That distinction prevents two opposite mistakes: sending the cutter every decorative path in a printed design, or assuming an imported SVG already has the one outer contour the print-and-cut workflow needs. Verify the assigned operation in the cut preview for your version.
When to import a cleaner SVG instead
Stay in SignMaster when the source is clean, the trace needs modest correction, and the resulting geometry is easy to audit. Use another route when the source needs stronger shape reconstruction, the trace creates excessive cleanup, or you want to compare results before committing.
PerfectVector's image-to-vector workflow reconstructs supported raster artwork as editable SVG shapes in a browser. Importing that SVG into SignMaster can skip the bitmap-tracing step, but it does not skip production setup. Inspect the imported scale, colors, holes, and paths, then assign the correct cut or contour operation.
SignMaster's Export Files page lists AI, DXF, EPS, PDF, SVG, and raster formats among its export options. Preserve a reusable vector master separately from the cutter-specific job file when your edition and workflow allow it.
Run one representative test cut
Use the real material, blade, mat or pinch setup, and a small sample containing the job's tightest corner, smallest hole, thinnest bridge, and most difficult weed area. A clean screen preview cannot prove the physical result.
If the test fails, separate geometry problems from machine settings. Fix doubled paths, tiny islands, and weak shapes in the artwork. Handle blade depth, force, speed, offset, overcut, registration, and calibration according to the cutter and material documentation. Changing trace precision will not repair a mechanical setup problem, and adding pressure will not repair a doubled contour.
FAQ
Can SignMaster vectorize a PNG or JPG? Yes. SignMaster's current Vectorizer documentation lists common bitmap formats and provides image-preparation and trace tools. Results still depend on the source and must be checked as paths before cutting.
Why does my SignMaster trace have too many nodes? The trace may be following pixel stair-steps, compression noise, texture, or an overly precise setting. Clean and simplify the bitmap, reduce accidental colors, retune precision and smoothness, then retrace before deleting points manually.
Why did a thick line become two cut lines? A fill trace usually follows both edges of a thick raster stroke, creating a closed band. If the job needs one centerline, use a centerline-appropriate workflow or redraw that path rather than treating the double outline as an error to hide.
Does importing an SVG automatically make it a contour cut? Not necessarily. A vector file provides paths, but SignMaster workflows may still require you to create or assign the contour-cut operation. Verify the cut preview in your installed version.
Should I vectorize a photo for vinyl cutting? Not with an ordinary filled trace unless you deliberately want a simplified posterized result. Choose print-and-cut with an outer contour, a purpose-built photo-to-cut effect, or a manually designed stencil depending on the intended product.
Sources
- SignMaster — Trace Tools — Supported bitmap inputs and image-preparation or correction tools.
- SignMaster — Trace Options — Adjustable contour precision and smoothness with repeatable tracing.
- SignMaster — Product overview — Current edition hierarchy and module context.
- SignMaster — ImageCut — Specialized photo-or-graphic cut-strip effect, distinct from an ordinary logo trace.
- Skycut with SignMaster — User manual — Vector imports and the separate assignment of contour-cut operations.
- SignMaster — Export Files — Current listed vector and raster export formats.
If the built-in trace keeps following noise instead of the intended shapes, compare an externally reconstructed SVG, import it into SignMaster, and verify its scale, geometry, and assigned cut operation before testing material.
More from the blog
Mimaki FineCut Image Trace: Build Cleaner Cut Paths
Compare FineCut Outline Extraction with an imported SVG, then check duplicate paths, holes, scale, and the final contour before sending a print-and-cut job.

SignLab Vectorize Image: Trace or Import Clean SVG?
Compare SignLab's native vectorization with an imported SVG. Learn how to prepare the bitmap, inspect paths, preserve holes, and test a production-ready file.