PNGtoSVG Layers: Remove Colors and Add Alignment Marks
Remove a palette color in PNGtoSVG, save the SVG, and check its compound paths and optional alignment marks before taking layered artwork into your next app.
On this page
PNGtoSVG's palette controls let you remove a detected color and add matching registration marks to color geometry. Save the result after each change and inspect the exported SVG. The interface's path counter and the number of SVG path elements can describe different things, so neither number tells you how many useful craft pieces you have.
This workflow uses PNGtoSVG.com, whose current interface includes a separate Classic link. It follows one source through a baseline, white removal and a registration-mark export. The result is a checked SVG file; machine import and material alignment still need their own test.
Choose the colors you need to keep
You need a permitted raster image, a retained original and separate filenames for your exports. Decide whether white is unwanted background, intended white artwork or both. A palette is the set of colors in the trace; removing one color can affect every region assigned that fill.
Our original control was a 384 × 256 RGB PNG on opaque white. It had a navy frame with a white center, a teal triangle, a gold rectangle and two small navy squares. We reused it unchanged and tested the live website on November 8, 2026. The site displayed a low-resolution warning for this source, which remains visible in the screenshot below.
Method: We retained three actual SVG exports and compared their XML, fills and document bounds. This is one small geometric control, not a photo-quality benchmark, a PerfectVector comparison or a Cricut import/cut test.
Save a baseline, then remove the white palette color
- Open PNGtoSVG.com and use browse files to select your source. Wait for the vector result rather than relying on the original-image view.
- Keep the automatic starting result for your first comparison. Our run used Logo/Clip art, High, colors 10, detail 84, smoothing 0, speckle 5 and corner 45; the detected palette contained four colors. These are recorded test settings, not a recommended preset for every image.
- Leave registration marks off and use Download to save
baseline.svg. - Find the white palette entry and select its × removal control. Wait for the result to update, then save a separate
white-removed.svg. - Compare the saved result with the original, especially any intended white details and small isolated marks.
PNGtoSVG's palette FAQ describes × as removing the color's paths. Treat that as a geometry change, rather than simply painting white a different color. If white lettering or a white highlight belongs in your design, inspect it before keeping this variant.
In our saved baseline, four path elements carried four fill colors, including white. After white removal, the SVG had three path elements and no white fill. The navy frame's center showed through the checkerboard in the website comparison, while the original's center stayed white.
If the removal loses wanted artwork, restore the color or reload the original and rebuild from your saved baseline. Do not keep changing the palette on top of a result that already fails an important detail.
Understand color paths before counting layers
The interface displayed 11 paths for our baseline, but the downloaded SVG contained four <path> elements. After white removal, the interface displayed 5 paths, while the file contained three path elements.
A compound path is one path element containing multiple subpaths. SVG explicitly allows this construction, including separate outlines and interior openings within one element. The SVG path specification explains that relationship. In this export, geometry with the same fill shared a path element, so the XML element count did not match the interface counter.
Use the counter to follow the tool's preview, then inspect how your destination app presents the saved geometry. A color path can contain several disconnected pieces. It does not establish a named editor layer for every visual object, and it does not prove that tiny pieces will be easy to cut or place.
For the next preparation step, our layered SVG guide separates color organization from a machine-ready project. If you need one file per color, see how to separate SVG colors into files.
Add registration marks only when you need alignment aids
PNGtoSVG's FAQ describes its registration marks as matching corner geometry added to each color layer. These are alignment aids for the color artwork. They are not established here as Cricut Print Then Cut sensor marks or as a substitute for your machine's own print-and-cut workflow.
With the white color still removed, enable registration marks and save a third SVG as white-removed-registration-marks.svg. Compare it with the unmarked export rather than overwriting that file.
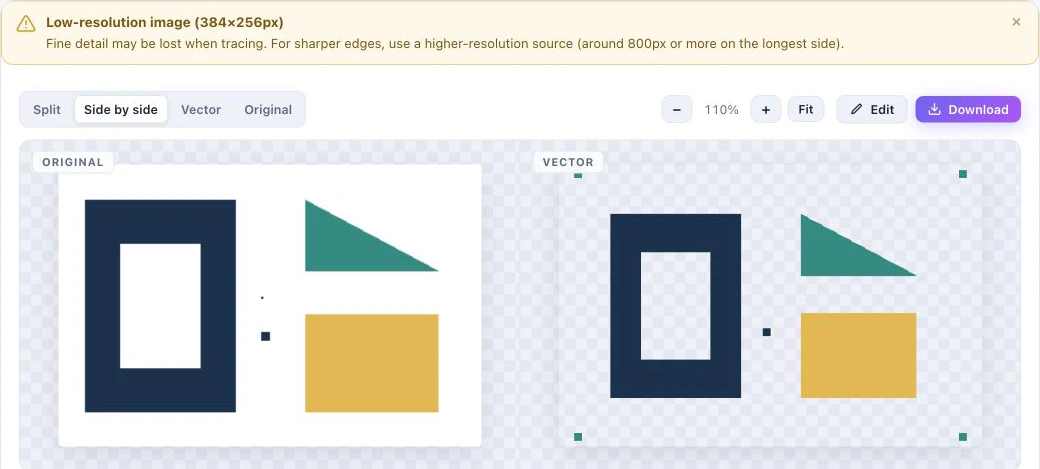
Our marked export still had three path elements. Each color path contained the same four 8 × 8 square subpaths at the corners. The marks expanded its viewBox from 0 0 384 256 to -20 -20 424 296; its width and height also changed from 384 × 256 to 424 × 296.
The viewBox describes the SVG coordinate region used for the drawing. In this example, the larger bounds include geometry outside the original image area. Keep that difference in mind when comparing document dimensions. It does not mean the central artwork was scaled to a new physical size.
| Export | SVG path elements | Bytes | Saved document bounds |
|---|---|---|---|
| Baseline | 4 | 3,106 | 0 0 384 256 |
| White removed | 3 | 1,648 | 0 0 384 256 |
| White removed, marks on | 3 | 2,024 | -20 -20 424 296 |
The matching square geometry is verified in these files. Successful alignment of actual material was not tested. Keep an unmarked copy, and decide in your destination app whether the extra shapes belong in the operation you are preparing.
Check the saved file before making a craft project
Open the accepted SVG independently of the website preview. Check that the intended colors remain, removed white does not erase wanted artwork, and separate color pieces still occupy the expected positions. If marks are enabled, inspect all four corners and the new document bounds.
For cutting, the remaining checks belong in your receiving app: physical dimensions, small details, color assignment and the operation applied to the alignment aids. Run a small material test before repeating a project. A successful browser download does not complete those steps.
The Cricut converter selection guide covers other starting routes. Stay with PNGtoSVG when its palette controls and saved geometry meet your job. Use a different trace or manual editing if the important regions remain awkward after a bounded test.
When an automatic trace is the next useful step
PerfectVector fits when you want to start from the original raster and inspect an automatic trace before doing craft preparation. Use the SVG for Cricut page with your own image, then inspect the smallest required piece, interior openings and each color region. This is a separate tracing option, not a claim that its output was measured against PNGtoSVG in this test.
PerfectVector's product facts describe a free view-only preview; editing and export follow unlocking a result. The resulting file still needs checks in your receiving app. If you already have acceptable geometry, retracing it adds no necessary preparation step.
FAQ
Why did the interface show more paths than the SVG file contained? Our saved color paths contained multiple subpaths, so one SVG path element could hold several separate contours. The interface counter was not the XML path-element count or a count of meaningful craft pieces.
Does removing white only recolor the background? No. PNGtoSVG describes the × control as removing that color's paths. Check any white artwork as well as the outside background before accepting the result.
Are these marks Cricut Print Then Cut sensor marks? This test establishes matching alignment squares in the exported color paths, not compatibility with Cricut's sensor-mark workflow. Use your receiving app's own instructions and verify the intended operation before production.
Sources
- PNGtoSVG — Image vectorizer and FAQ — Current palette removal, registration-mark description and actual interface used in this test.
- W3C — SVG 2 paths — Multiple subpaths can belong to one path element.
- W3C — SVG 2 coordinate systems — The viewBox and coordinate-region distinction used to describe the marked export.
- PerfectVector — Product facts — Free preview and the unlocked editing/export boundary.
Start free with your own image in PerfectVector, then inspect its colors, openings and smallest pieces before preparing a project in your craft app.
More from the blog
Drawing to Appliqué SVG: Plan the Fabric Pieces
Turn a drawing into an appliqué SVG plan. Inspect color regions, overlaps and tiny details, then keep a placement master before making fabric cutting templates.

Convert an Image to SVG for Clean 3D Printing
A 3D printer can't extrude pixels, so flat designs start as an SVG. Here's how to turn an image into a clean, closed-path SVG that imports and extrudes the first time.