
PicSVG Filters: Compare Edge, Internal and Clean
Compare three PicSVG filters on one image, save each SVG separately, and check which regions, openings and background treatment fit your intended design.
On this page
Choose PicSVG filters by comparing saved results from the same image. Keep Details fixed, change one named filter at a time, and check the regions and openings you need. In our geometric control, Edge 2 emphasized boundaries, Internal 1 retained two filled shapes but omitted a triangle, and Clean 1 changed the background treatment. The shortest path list was not automatically the most useful version.
If none of the effects keeps the shapes your project needs, start free with PerfectVector on the PicSVG alternative page and compare the preview’s silhouettes, openings and color regions with your source. Editing and export follow unlock. The filter workflow below is complete on PicSVG itself; we did not run an output-quality comparison between the services.
Start with one source and a fixed Details setting
This guide uses the PicSVG website, whose tested page identified itself as Beta V3.4. Its ordinary converter provides an upload, selectable effects and an SVG download. The site names JPG, GIF and PNG inputs up to 4 MB. Use an image you have permission to convert and preserve the original.
Our uploaded source was an original 320 × 240 RGBA PNG: a navy rectangular frame with a transparent center, a gold triangle and a teal block on a transparent background. The website’s ORIGINAL RESIZED preview displayed those transparent areas as white. Our comparison addresses filter selection. We did not test transparency preservation or inspect an intermediate file that would explain the site’s alpha handling. That makes several questions easy to separate: does a filter retain each shape, keep the frame opening, preserve color or add background geometry?
- Use UPLOAD A PICTURE to load the source.
- Keep Details: Strong while comparing the filters.
- Select a named filter using the visible Filters dropdown and confirm its displayed label.
- Wait for the preview to update, inspect it, then use DOWNLOAD SVG.
- Save a distinct local filename before choosing the next filter.
We tested Edge 2, Internal 1 and Clean 1, all with Strong. Strong is the setting held constant in this experiment; we did not compare it with other Details values or establish that it keeps every small feature. The ordinary conversion route completed without Supermode.
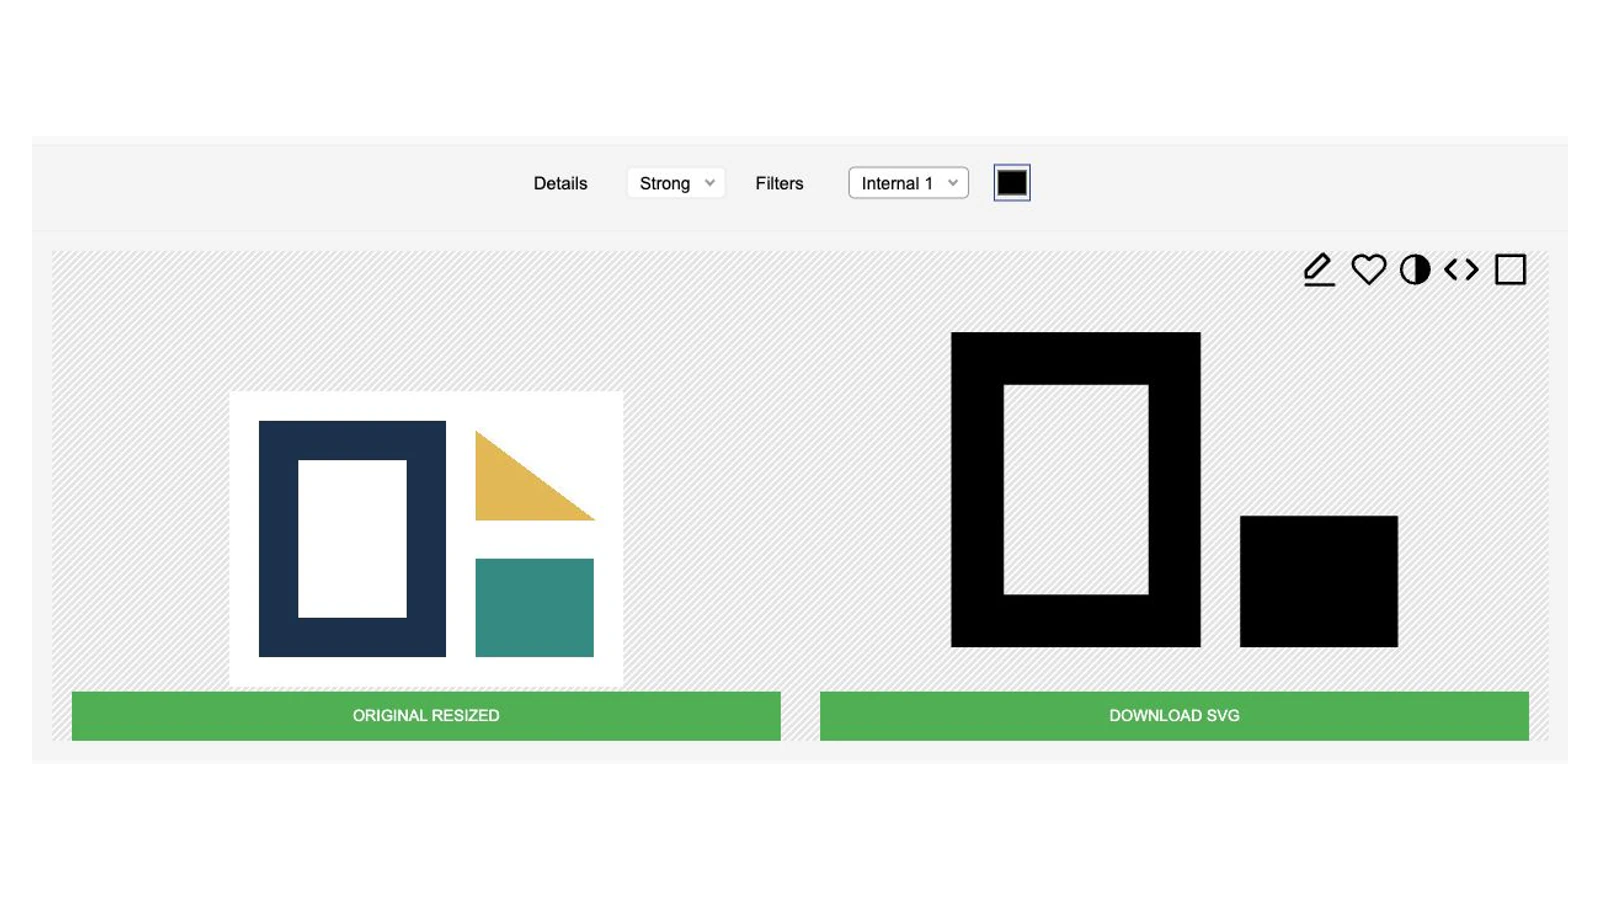
Compare what Edge 2, Internal 1 and Clean 1 retain
The three actual downloaded SVGs produced different treatments of the same source. We inspected their markup and rendered the retained files locally. These are observations about this control, rather than definitions that predict every image.
| Filter, with Details Strong | Visible result on this source | Decision to make |
|---|---|---|
| Edge 2 | Thin black boundary bands around the frame, triangle and block; the large interiors are transparent | Whether you want boundary-shaped artwork rather than the original filled regions |
| Internal 1 | A black filled frame with an open center and a black block; the gold triangle is absent | Whether the omitted light-colored region is acceptable |
| Clean 1 | Black background and interior regions separated by narrow transparent boundary bands, including the triangle boundary | Whether that background treatment belongs in the intended design |
For a filled version that must retain all three shapes, none of these particular results is an automatic keeper. Internal 1 preserves the frame’s opening but loses the triangle. Edge 2 retains its boundary while changing the filled appearance. Clean 1 includes black geometry where the uploaded PNG has a transparent background and frame center. Choose against the drawing’s requirements, not a filter name that sounds more polished.
Zoom into a few decisive locations instead of judging only the full-page thumbnail. In this source, the triangle and the frame center reveal much more than the large black block. If an opening unexpectedly becomes filled, the SVG holes guide helps distinguish fill rules and overlapping shapes. For background checks, use the transparent SVG guide.
Save each variant before changing the filter
Use filenames that preserve the actual settings, such as edge2-strong.svg, internal1-strong.svg and clean1-strong.svg. Keep them beside the untouched source. PicSVG’s page also describes a local saved-images area for comparing results; we used separately retained SVG files for this test rather than treating that area as durable storage.
During our run, the download address was reused while the selected filter changed. Each file was therefore retrieved immediately under its visible filter state. A reused address is not a reliable record of which result you kept; the local filename, settings note and actual file contents are the useful record.
All three files contained paths and no image element. Their counts were seven for Edge 2, two for Internal 1 and five for Clean 1. Those counts establish different saved structures, not a quality ranking. The two-path result still omitted a required shape in our control.
All three used a parent group with black fill and stroke="none". The thin-looking Edge 2 boundaries are therefore filled geometry in these files, not evidence of centerline strokes. The SVG painting specification distinguishes painting a shape’s interior from stroking its outline. The line-art tracing guide explains how that distinction affects artwork choices.
Check the saved bounds before the next application
The files also differed in their root size declarations:
| Saved variant | Root width and height | viewBox |
|---|---|---|
| Edge 2 / Strong | 320 pt × 240 pt | 0 0 320 240 |
| Internal 1 / Strong | 320 pt × 240 pt | 0 0 320 240 |
| Clean 1 / Strong | 960 pt × 720 pt | 0 0 960 720 |
These are actual saved fields, including their pt units. They are not a report of the imported physical size. A viewBox defines the internal coordinate rectangle mapped into the SVG viewport, as the SVG coordinate specification explains. We rendered the variants at the same review size to inspect their treatment; that does not make their size declarations identical.
Before keeping a file, open that specific SVG and check the required shapes, openings, background and declared bounds. Then test it in your receiving application at the size you need. We did not perform that import, a manual edit, printing or cutting.
| Failed check | Next action |
|---|---|
| A light region disappears | Compare another filter against that exact region in the source |
| A thin preview is being treated as a centerline | Inspect fill/stroke and actual geometry before choosing the next workflow |
| The result adds unwanted background regions | Compare another effect and inspect the saved file against a contrasting background |
| Several saved files appear identical unexpectedly | Recheck the visible filter label and save each updated result under a distinct filename |
| The file enters another app at an unexpected size | Inspect units and bounds, then set and verify the intended size in that application |
Keep the PicSVG result when its effect meets the job. If the required regions still do not survive, start free with PerfectVector on the PicSVG alternative page and check the preview’s shapes, openings and colors against the same original before deciding which workflow to keep.
FAQ
Which PicSVG filter is best?
Choose the effect that retains the regions and openings your image needs. In our control, Edge 2 emphasized boundaries, Internal 1 omitted the gold triangle, and Clean 1 changed the background treatment. No single result met every possible use.
Does Details Strong preserve every small feature?
That was not established. We held Strong fixed while changing three named filters. Even at that setting, Internal 1 omitted a required triangle in our control. Inspect your critical regions rather than relying on the setting’s name.
Do fewer SVG paths mean a cleaner result?
No. The saved variants had seven, two and five paths. The two-path file still lost a shape we wanted. Compare retained artwork and geometry instead of choosing the smallest path count alone.
Do thin PicSVG edges mean the SVG contains centerline strokes?
No. Our three saved files used black filled geometry with stroke set to none. A thin-looking result can still be a filled band around a region. Inspect the actual fill, stroke and paths for the workflow you need.
Sources
- PicSVG official converter — website input guidance, selectable effects and SVG saving workflow.
- W3C SVG painting specification — the difference between fill and stroke.
- W3C SVG coordinate systems — viewBox, viewport mapping and units.
More from the blog

Potrace PNG to SVG: Handle Alpha and Keep Holes
Convert a PNG with Potrace after preparing its alpha channel. Follow a tested PGM workflow, compare thresholds, and check the SVG's background and inner holes.

SVGcode Image Tracing: Check the Shapes You Export
Trace a flat-color image in SVGcode, copy the actual SVG, and check its palette, inner openings, background and canvas before using the file in your design.