Image to SVG for LOKLiK: Trace, Import, and Cut
Turn a PNG or JPG into a clean SVG for LOKLiK IdeaStudio, import it at the right size, inspect layers and paths, and test the cut before using material.
On this page
- Start with the operation, not the extension
- What makes an image worth tracing
- Trace in IdeaStudio or prepare the SVG first?
- Image to SVG for LOKLiK, step by step
- 1. Define the finished size and material
- 2. Clean a working copy of the raster
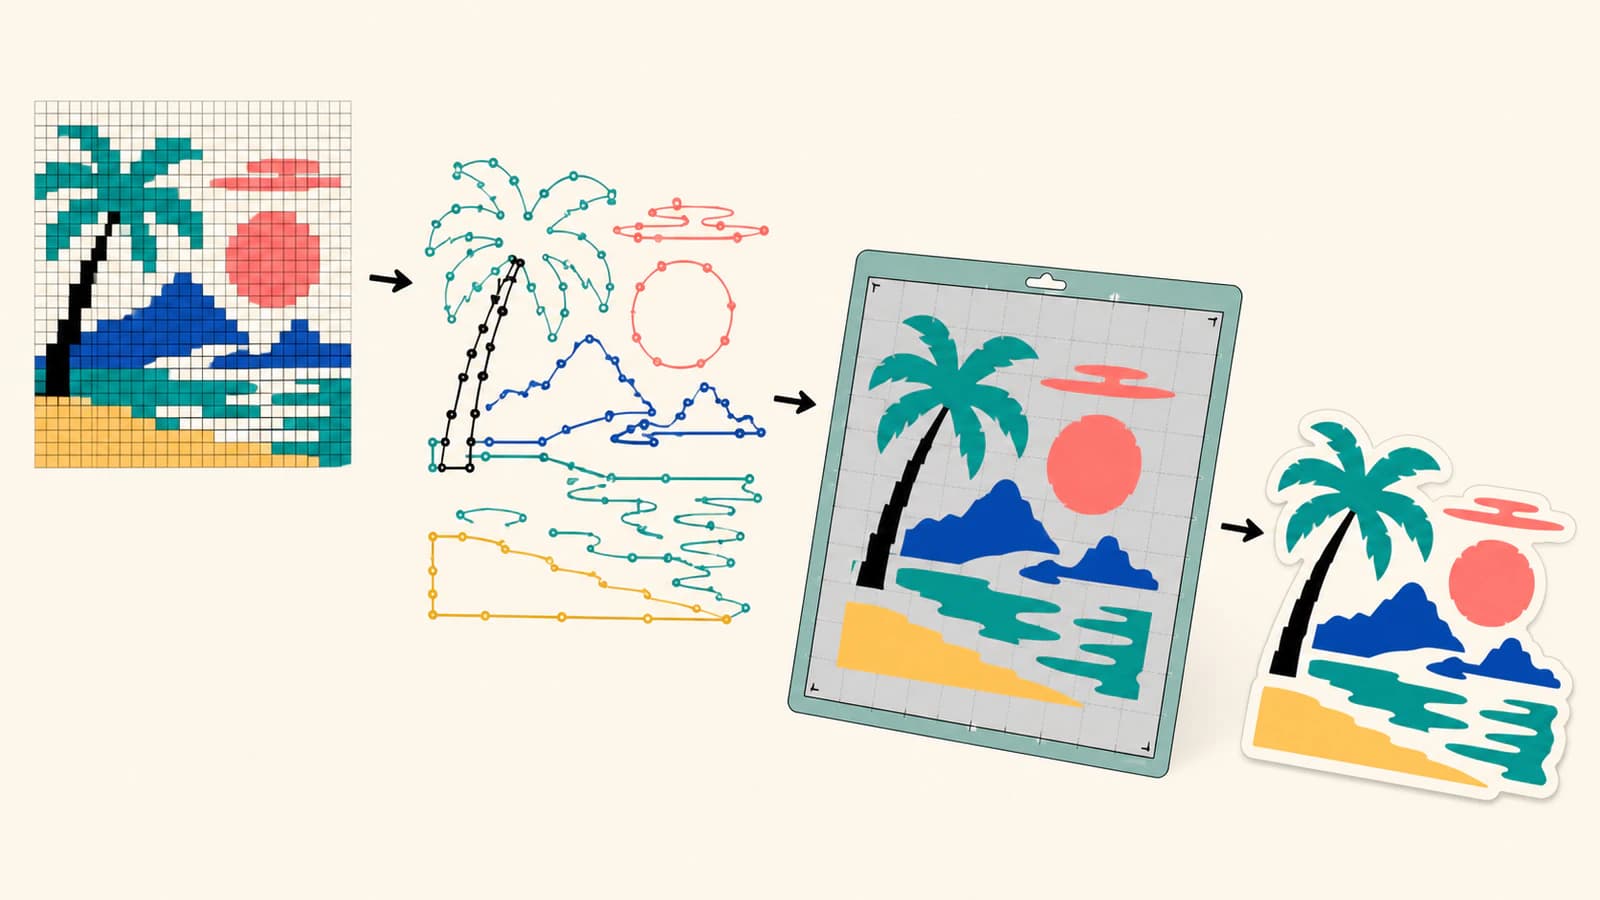
- 3. Build real SVG paths
- 4. Open the SVG in a second viewer
- 5. Import it into IdeaStudio
- 6. Verify size, layers, and operations
- 7. Preview and test
- Common IdeaStudio import problems
- The SVG arrives as one image
- The import has too many layers
- The edges are jagged
- Holes fill in
- The size changes
- LOKLiK SVG preflight
- FAQ
- Sources
To make a reliable standard cut in LOKLiK IdeaStudio, turn suitable flat artwork into clean SVG paths before the job reaches the mat. Importing a PNG and accepting the first automatic outline can work for a bold silhouette, but detailed or noisy art often produces extra pieces, rough edges, and a longer cleanup.
One naming note before the workflow: HTVRONT's current app guide says LOKLiK IdeaStudio was renamed HTVRONT IdeaStudio in 2026. Older tutorials and search results still use the LOKLiK name, while the current app may show HTVRONT branding. The official guide says existing features and project files remain compatible.
The short route
- Decide whether the job is a standard cut, Print Then Cut, or tonal engraving.
- Use SVG paths for a standard cut; keep a clean raster when pixels are the intended print or engraving data.
- Vectorize simple flat artwork, then remove specks, doubled outlines, and tiny islands.
- Import the SVG into IdeaStudio, verify physical size and layers, assign the intended operation, and inspect the final preview.
- Test representative detail on scrap material before the full job.
Start with the operation, not the extension
The current HTVRONT app tutorial says the app can import vector and bitmap artwork, including SVG, PNG, JPG, BMP, and DXF. It also makes the useful distinction that vector files suit clean cutting while bitmap images can be appropriate for high-contrast engraving.
That means “convert everything to SVG” is the wrong rule.
| Intended result | Better input | Why |
|---|---|---|
| Standard cut from vinyl, cardstock, or similar sheet material | Clean SVG paths | The machine needs boundaries to follow |
| Printed sticker or other print workflow | Transparent PNG or other supported print asset, with a cut boundary | The printed color and texture remain pixel-based |
| Tonal engraving | Suitable raster image | Grayscale or tonal pixels may be the actual operation data |
| Simple line or silhouette engraving/cut | SVG or DXF geometry | The operation follows defined lines or contours |
If you only need a printed photograph with a contour, tracing every color into vector layers makes the file worse. If you need the machine to cut separate shapes, a flattened PNG leaves the software to guess those boundaries.
What makes an image worth tracing
Good cut-file sources have visible boundaries, a limited palette, and details large enough to survive at the intended size. Logos, icons, bold line art, simple mascots, and flat clip art usually give you something useful to work with.
Expect more manual decisions when the source contains:
- soft shadows, glow, or gradients;
- compression blocks or a noisy background;
- hair-thin lines and tiny gaps;
- photographic texture;
- overlapping colors that look separate but share no clear boundary;
- lettering baked into a low-resolution screenshot.
Use the highest-quality original you can find. Cropping a social-media screenshot and enlarging it does not restore the missing edge information.
Trace in IdeaStudio or prepare the SVG first?
IdeaStudio can process uploaded images. HTVRONT's official guide describes image vectorization controls that adjust color tolerance and remove unwanted color blocks before the result reaches the canvas. That is a reasonable route for a simple silhouette or a quick project.
Prepare the SVG outside the app when you need tighter control over color regions, node count, holes, or duplicated paths. LOKLiK Europe's IdeaStudio software page explicitly describes making a design in another application, saving it as JPG, PNG, or SVG, and importing it.
The choice is practical:
- Try the built-in route when the source is clean, bold, and nearly one shape.
- Bring a prepared SVG when the design has multiple color layers, counters, fine corners, or a built-in trace that creates too many fragments.
- Keep the raster when print or tonal engraving needs the original pixels.
A current community support discussion about IdeaStudio re-vectorizing an SVG also makes an important workflow distinction: a clean SVG should add as vector artwork; sending it through an image-conversion step again is unnecessary. Treat the imported structure as something to verify because app versions and file construction still vary.
Image to SVG for LOKLiK, step by step
1. Define the finished size and material
Write down the final width and height before tracing. A detail that looks generous on a monitor may become an unweedable sliver at decal size. Material, blade condition, pressure, and machine calibration all affect what survives, so there is no universal minimum feature size.
2. Clean a working copy of the raster
Crop unrelated content, remove an accidental background, and increase separation only enough to make intended boundaries clear. Do not sharpen until halos appear around the edges; a tracer may convert those halos into extra paths.
If the file contains several colors, decide which ones need separate material layers. Merge near-duplicates that are visually the same. Every unintended shade can become another object or cut layer.
3. Build real SVG paths
Use the cut-file SVG converter to reconstruct suitable artwork as paths. Inspect the preview before downloading:
- the outer silhouette should be closed where a filled piece is intended;
- holes inside letters and shapes should remain open;
- there should be no full-page background rectangle;
- one intended outline should not become a thin double-walled ring;
- tiny specks and isolated fragments should be removed;
- color regions should match the layers you actually plan to cut.
PerfectVector provides a vector starting point for suitable raster artwork. It does not know your material, choose an IdeaStudio operation, or guarantee that every fine detail will weed. Those decisions remain part of the cut workflow.
4. Open the SVG in a second viewer
Reopen the downloaded SVG in a browser or vector editor. Zoom in, select shapes, and confirm that the artwork is made of paths rather than one embedded image. If the file looks right but selects as a rectangular image object, it is not a prepared cut file.
5. Import it into IdeaStudio
Use the app's Upload or import surface to add the SVG. Desktop and mobile wording can differ, so focus on the result rather than a memorized button sequence. The clean vector should arrive as editable or separable vector elements, not enter a raster-cleanup flow.
If the app asks to trace the already prepared SVG, stop and inspect the file. It may contain an embedded bitmap, unsupported construction, or a raster image saved with an .svg extension. The mixed-content SVG audit shows how to check.
6. Verify size, layers, and operations
Measure the design in the app and compare it with the intended physical size from step 1. Then inspect the layer or object list. Confirm that:
- each material color or operation has the expected shapes;
- holes are still holes;
- no hidden background or duplicate silhouette appeared;
- the cut, draw, score, engrave, or print role matches the project;
- mirrored output is enabled only when the material workflow calls for it.
Do not assume color alone assigns the correct machine operation.
7. Preview and test
HTVRONT's official workflow tells users to verify size, orientation, and operation order on the preview page before sending, and to conduct a frame test with the connected machine. For a cutter project, also test the smallest representative feature on scrap from the same material batch.
Watch the preview for unexpected inner cuts, doubled contours, reversed layer order, or pieces that sit outside the prepared footprint. A test that weeds cleanly is stronger evidence than a clean-looking canvas.
Common IdeaStudio import problems
The SVG arrives as one image
The document may contain an embedded PNG rather than vector paths. Open it in a text editor and search for <image, or select it in another vector editor. Re-vectorize the original flat artwork rather than repeatedly exporting the wrapper.
The import has too many layers
The trace probably preserved noise or near-duplicate colors. Return to the source or vectorizer, reduce the palette, remove specks, and regenerate a simpler SVG. Deleting dozens of mystery fragments inside the cutting app is usually slower.
The edges are jagged
A small or compressed source gave the tracer a stair-stepped boundary, or the path contains too many poorly placed nodes. Use a better source and inspect the geometry before import. Avoid smoothing so aggressively that corners and letterforms change.
Holes fill in
The inner and outer contours may not be combined correctly, or their direction/fill rule may not survive the handoff as expected. Check the compound-path structure in a vector editor and use the filled-hole troubleshooting guide.
The size changes
File dimensions, viewBox, units, and import behavior can disagree. Record one intended measurement, set it after import if needed, keep the aspect ratio locked, and verify a second dimension before cutting. For reusable work, keep a known-size calibration shape outside the final production file.
LOKLiK SVG preflight
- The operation is chosen: standard cut, print, engrave, draw, or score.
- The source has clear boundaries and only necessary colors.
- The SVG contains paths, not a wrapped bitmap.
- Silhouettes are closed and holes remain open.
- There are no doubled outlines, stray points, or background rectangles.
- Layer count matches the planned materials and operations.
- Imported physical size matches the project.
- Orientation and mirroring are correct for the material workflow.
- The final preview contains only intended toolpaths.
- Representative detail passed on scrap material.
For a reusable file-quality pass independent of the app, run the five-minute cut-file audit before every important job.
FAQ
Can LOKLiK IdeaStudio import SVG files? Yes. Current HTVRONT guidance lists SVG among the app's supported imports. A clean SVG is the better starting point for standard cutting because it carries defined vector geometry.
Is LOKLiK IdeaStudio now called HTVRONT IdeaStudio? Yes. HTVRONT's official app tutorial says the LOKLiK IdeaStudio name changed to HTVRONT IdeaStudio in 2026 and that existing features and project files remain compatible.
Should I upload a PNG or SVG for a LOKLiK cut? Use a clean SVG when the job needs standard cut paths. Keep a supported raster when the pixels are intentional for printing or tonal engraving, then add the correct boundary or operation in the app.
Why does my SVG need tracing again in IdeaStudio? It may contain an embedded bitmap instead of real paths, or you may have entered an image-vectorization flow unnecessarily. Inspect the file in a vector editor and check its source for an image element.
How do I stop tiny pieces from appearing in the cut preview? Return to the trace, remove background noise, merge near-duplicate colors, and delete fragments that are not part of the design. Reimport and test the smallest intended feature on scrap.
Sources
- HTVRONT — How To Use the HTVRONT App — Current official app naming, supported import formats, vectorization, operation assignment, preview, and frame-test guidance.
- LOKLiK Europe — IdeaStudio — Describes preparing designs in external software and importing JPG, PNG, or SVG files into IdeaStudio.
- HTVRONT / LOKLiK Community — SVG conversion issue — Current support discussion distinguishing direct import of a clean SVG from unnecessary raster-vectorization steps.
Ready to prepare a standard cut instead of asking the app to guess the outline? Convert the flat source into clean SVG paths, import at the intended size, and approve the job only after the final preview and a scrap test agree.
More from the blog
Shadow Box SVGs: Design Connected Paper Layers
Design a layered shadow-box SVG with aligned frames, connected paper shapes, and a checked stacking order. See how a floating moon changes the saved geometry.

Cricut Knockout Designs: Plan the Base and Name Layers
Plan a Cricut knockout design with a retained name and a clearance-subtracted base. Check the separate SVG parts, shared placement, and deliberate gap.