
Soft vs Hard Enamel Pins: Read the Artwork Map
Compare raised soft-enamel outlines and flush hard-enamel surfaces using one artwork map. Label metal, color and finish before reviewing the factory proof.
On this page
Soft enamel normally leaves the colored fill below the surrounding metal, so the metal edges feel raised. Hard enamel is filled and polished to a surface where the enamel and exposed metal are flush. The same flat drawing can describe either intended design, but it needs a clear construction note: a colored region on screen does not tell a factory whether that region should sit below the metal or finish level with it.
Start by labeling what the shapes mean, then discuss the surface with the manufacturer. Choosing “hard enamel” does not mean removing the metal lines from the drawing. Those lines can remain visible even when they no longer project above the color.
Read the flat map before choosing the surface
An artwork map identifies the pin’s outside shape, visible metal and intended color regions. It is a top-view description, not a cross-section or an automatic manufacturing model.
Custom Comet’s construction comparison describes soft enamel’s raised metal and recessed color, and hard enamel’s polished smooth finish. Those surface relationships explain why two pins can look similar in a flat proof while feeling different in the hand.
Keep these questions separate:
| Question | What the artwork or note must identify |
|---|---|
| What is the pin’s outside contour? | The intended metal silhouette and any actual cutouts |
| Which visible areas are metal? | The outer frame, separating lines and deliberate metal details |
| Which areas receive enamel? | Closed color regions with the factory’s requested color references |
| What surface is intended? | Soft enamel relief, flush hard enamel or a separately specified coating/effect |
A dark area in a reference picture is not automatically black enamel. It might represent visible metal, a printed mark, a shadow or an opening. Give it a production role before discussing its appearance. Our one-color negative-space guide distinguishes an unpainted opening from a white-filled shape; a physical pin cutout still needs an explicit factory instruction.
Keep the metal when hard enamel becomes flush
Recessed means the enamel surface sits below the neighboring metal. Flush means the exposed surfaces meet at the same intended level. These terms describe the face of the pin, not whether the illustration has a black outline.
WizardPins’ process explanation describes partially filled soft-enamel cavities and hard enamel polished level with the surrounding metal. The metal remains visible in its hard-enamel example; a smooth face does not turn every region into one continuous color.
That distinction matters when the metal is part of the character. An eyebrow, a leaf vein or a letter separator can still be visible metal in a hard-enamel design. The desired difference is its relationship to the adjacent enamel surface. Do not erase it merely to make the flat file “look smooth.”
Likewise, a drawn highlight or drop shadow is not a reliable instruction for relief. Keep presentation effects in a reference view if useful, and supply an unambiguous map plus the requested finish description.
Follow one original map into two schematic surfaces
We authored a simple badge map with a dark metal frame and central divider, plus two enclosed color regions. Two plan views in the figure reference the same native SVG shape definition. Their positions differ; their outside contour, divider and color-region geometry do not.
Below each plan view, a section across the two colored regions shows the intended surface relationship. The soft-enamel section puts the color tops below the metal top. The hard-enamel section puts the color tops level with the metal top. The matching colors identify which map regions appear in each section.
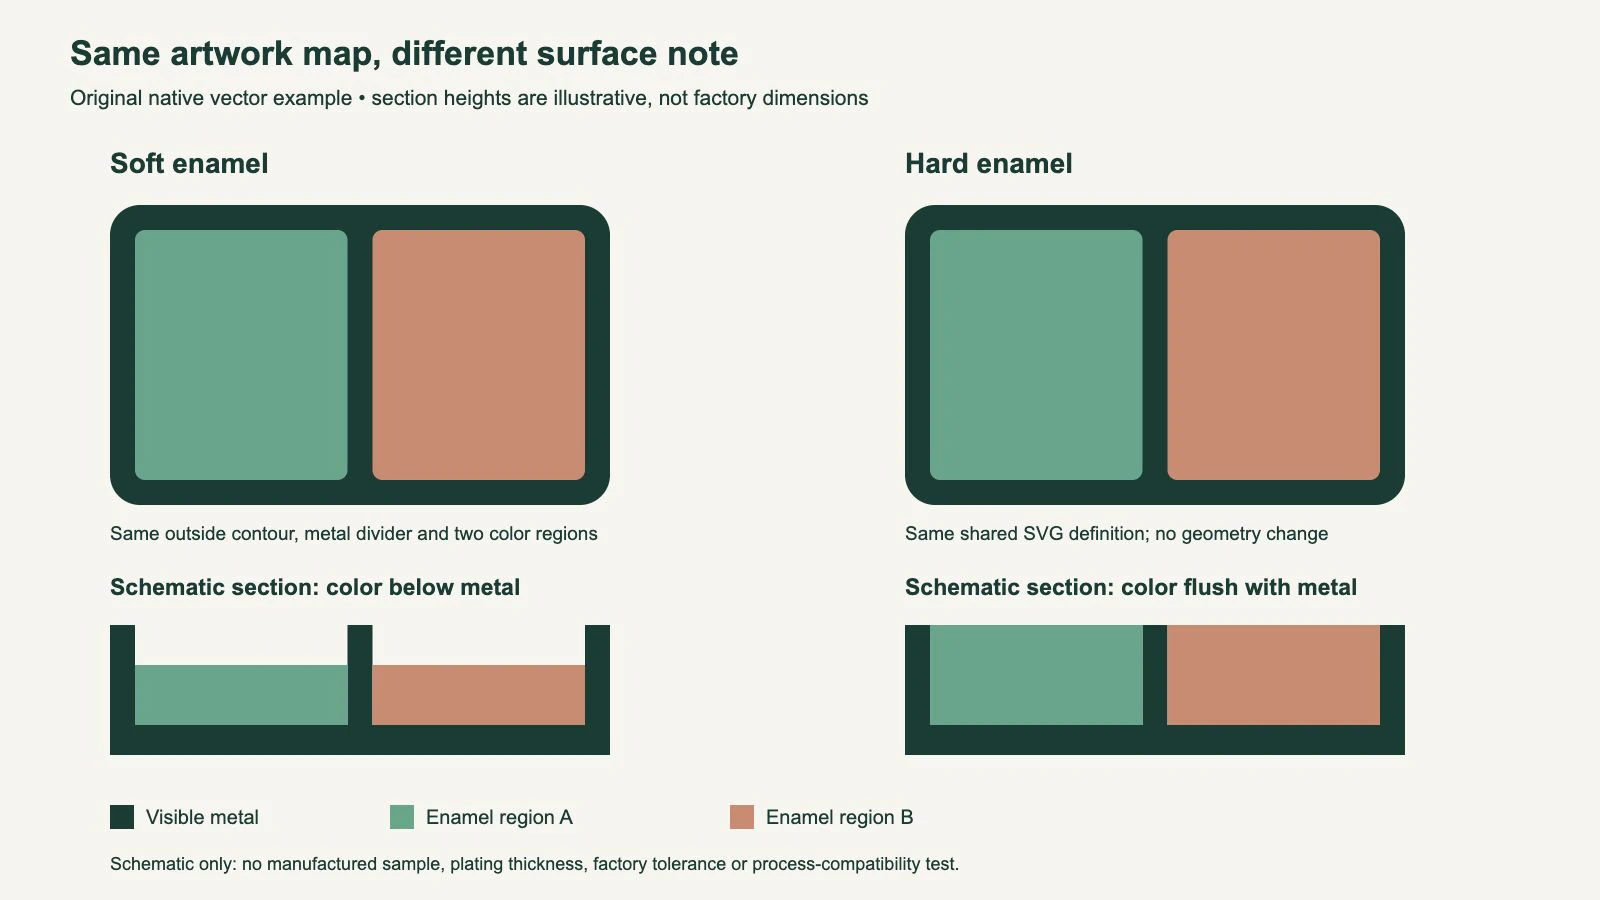
We reopened the SVG, verified that both plan views use the same map definition, and checked the section coordinates for recessed versus flush tops. The diagram establishes that relationship within our authored drawing. It does not establish that a factory can produce the exact design unchanged in both constructions.
No pin was manufactured or measured for this example. The cross-sections omit process details, plating thickness, rounded transitions and other features that require the actual supplier’s specification. They are a way to ask a clearer production question, not a substitute for its proof.
Add a finish note that resolves the ambiguity
A useful handoff describes the desired result without inventing factory dimensions. For this original map, a soft-enamel direction could say:
Dark regions indicate visible metal. Fill the two labeled regions with the specified enamel colors. Request a soft-enamel face with the metal visibly raised above the enamel, subject to the factory’s artwork review. No clear coating is requested in this reference.
A hard-enamel direction could retain the same map and change the construction note:
Dark regions indicate visible metal. Fill the two labeled regions with the specified enamel colors. Request a polished hard-enamel face with exposed metal and enamel flush, subject to the factory’s artwork review.
These are original example notes, not text copied from a manufacturer or approved production instructions. Add the actual finished size, plating, color references, attachment and other requested job information. The factory may revise boundaries or details when interpreting the map for its process.
For the full submission and proof checklist, use our enamel-pin artwork preparation guide. This comparison focuses on reading the map and specifying the surface; it does not replace the broader preparation work.
Check coatings and printed details separately
A smooth-feeling surface does not prove a pin is hard enamel. Alchemy Merch explains that a clear epoxy resin can coat soft enamel, producing a smooth, glassy surface over the underlying construction. Ask whether a sample or quotation includes that coating before using touch or a photo to identify the process.
If your design depends on exposed raised metal, a coating is a separate decision. Describe the relief you want the user to feel and confirm how the supplier’s proposed finish affects it. Do not infer that every pin labeled “soft enamel” has the same final surface treatment.
Alchemy also describes printed details as an option for artwork beyond ordinary metal-and-enamel regions. A fine mark may therefore need a print note rather than an additional enamel cavity. Confirm its compatibility with the chosen finish instead of quietly relabeling every small colored shape as enamel.
Ask which details change in the factory proof
Send the same reference map when comparing construction options so the supplier can identify any required changes. Ask it to mark widened boundaries, merged or removed regions, altered lettering and printed additions. Compare the interpretation at the requested finished size.
Do not select a construction from a universal price, lead-time or durability ranking. Those depend on the supplier and order. Ask for the actual quotation and proof for the combination you intend to buy. The relevant design decision here is whether you want recessed color with raised exposed metal, a polished flush face, or an explicitly specified coating or print treatment.
For a flat logo or badge available only as a bitmap, PerfectVector’s enamel-pin artwork workflow can reconstruct visible contours as an SVG candidate. Compare the silhouette, metal-like boundaries and small gaps with the reference, then assign their production meaning in a vector editor and the factory proof. Vectorization does not know which dark region you intend as metal, create a relief model or approve a finish. Our demonstration map was authored directly, without tracing.
Keep an existing native vector master when available. For source recovery, the logo vectorization guide compares tracing with redrawing. A faithful path outline and a correct manufacturing interpretation are separate checks. Changing the file extension to SVG does not settle the construction question.
FAQ
Does hard enamel mean there are no metal outlines? No. Exposed metal can remain visible while finishing flush with the enamel. Keep the intended metal boundaries in the artwork and specify the construction separately.
Can the same artwork be used for soft and hard enamel? The same flat map can communicate both intended designs, as our original diagram shows. That does not guarantee identical manufacturing geometry. Ask the factory to identify any changes needed for each construction and review the proof.
Can a soft-enamel pin have a smooth surface? Yes. A clear epoxy coating can cover soft enamel and create a smooth surface. Confirm whether that treatment is included rather than identifying the construction from surface feel alone.
Sources
- Custom Comet: Soft enamel versus hard enamel pins — Raised/recessed soft-enamel construction and polished hard-enamel finish.
- WizardPins: Soft enamel versus hard enamel pins — Filling and polishing relationships, with visible metal retained in the finished design.
- Alchemy Merch: Enamel pins 101, hard or soft enamel — Surface relationships, optional epoxy coating and printed-detail distinctions.
Working from a flat bitmap badge? Create and inspect an SVG candidate, label metal and color roles, and send the reviewed map with an explicit finish note for the manufacturer’s proof.
More from the blog

What File Format Should a Logo Be? A Practical Guide
Which logo file format for web, print, embroidery, or a vendor request, in one decision table, plus how to recover a vector master when all you have is a PNG.

Gobo Keystone Distortion: Check the Projection Geometry
Separate trapezoidal gobo projection from a damaged logo. Check a projective example, keep the master, and prepare the measurements your supplier needs.