LaserPecker SVG Import: Keep Your Artwork as Vectors
Import SVG files into LaserPecker Design Space as editable vectors, choose line, fill, or cut modes, and use image fallback only when compatibility fails.
On this page
- Vector mode and image mode are not interchangeable
- Prepare a portable SVG before import
- Import the SVG as vectors
- 1. Select Vector Import Mode
- 2. Import the delivery copy
- 3. Check whether objects remain editable
- 4. Choose the operation by geometry and material
- When Image Format Import is the right fallback
- Rebuild a PNG as SVG when you need vector operations
- Troubleshoot a bad LaserPecker SVG import
- A compact preflight checklist
- FAQ
- Sources
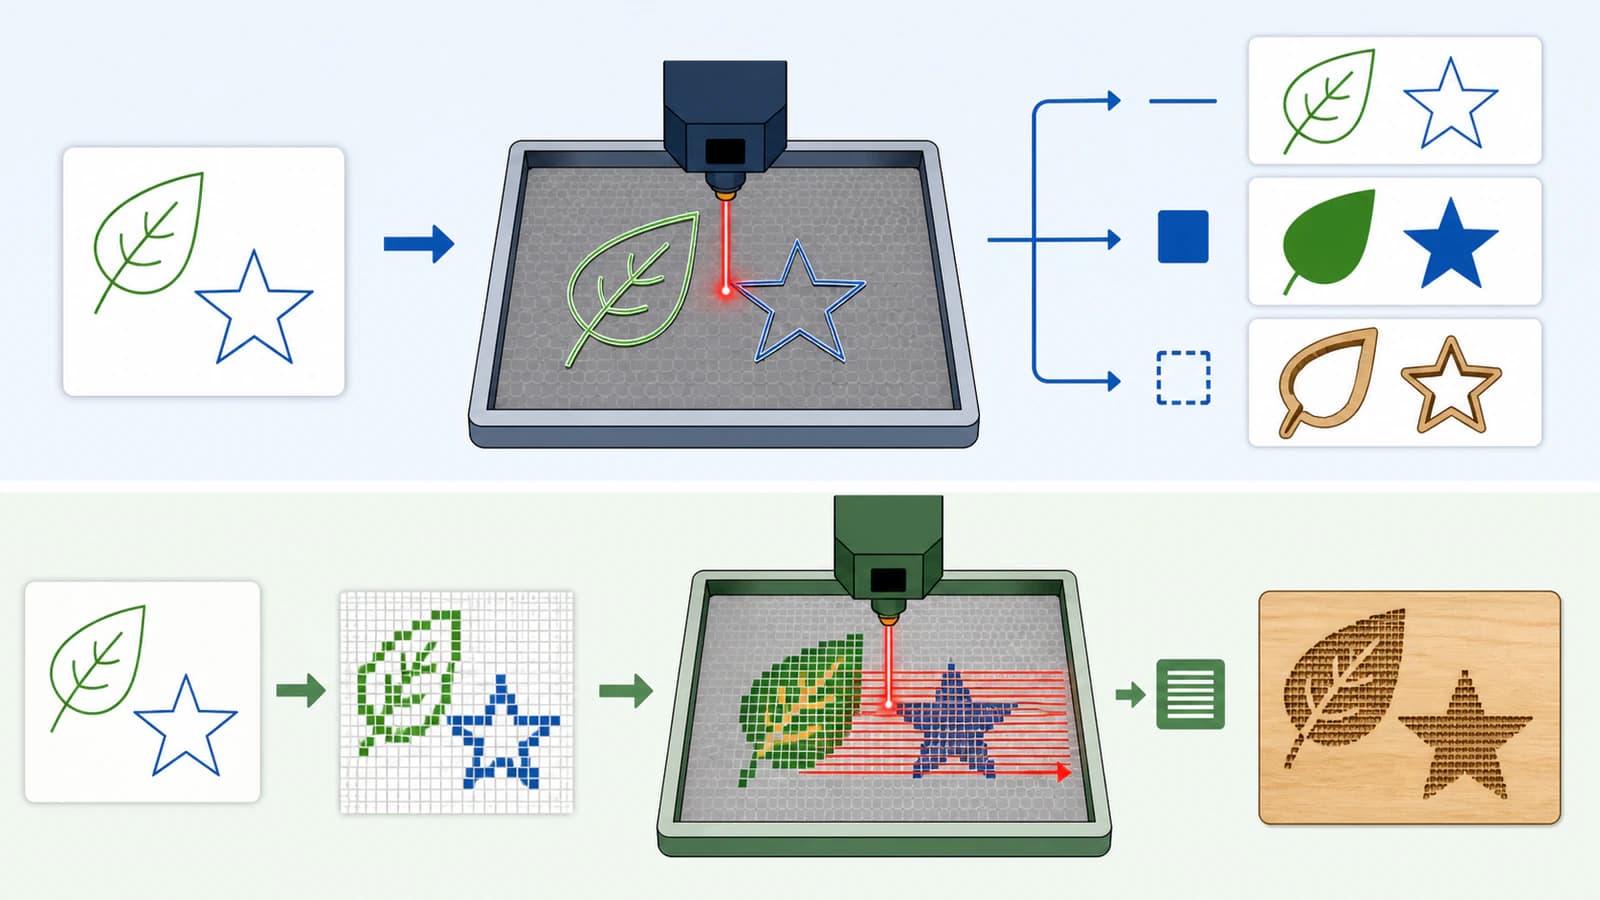
LaserPecker Design Space can import an SVG as editable vector objects or render it as a raster image. Choose Vector Format Import when you need line engraving, fill engraving, cutting, or editable shapes. Switch to Image Format Import only when the SVG displays incorrectly and a raster engraving is acceptable.
That setting changes what you can do after import. It is not just a different way to preview the same file. If you use MakeIt instead, the WeCreat MakeIt SVG import guide covers path groups, scale, and explicit operation assignment.
The reliable import route
- Open the SVG in a vector editor and confirm that the artwork is made from paths.
- Remove hidden objects, unnecessary clipping, stray points, and unsupported-looking effects.
- Convert live text to outlines in a delivery copy.
- In LaserPecker Design Space, set Vector Import Mode to Vector when you need editable vector objects.
- Check size, geometry, and the assigned operation before processing.
- If the SVG renders incorrectly, try Image mode only when image engraving still meets the job.
- Preview the placement and test on representative scrap with the machine's required safety setup.
Vector mode and image mode are not interchangeable
LaserPecker's current Vector Graphic Import Methods guide documents two SVG import modes in LDS 3.X Beta:
| SVG import mode | What LDS receives | Supported processing in the guide | Use it when |
|---|---|---|---|
| Vector Format Import | Editable vector objects | Line Engraving, Fill Engraving, and Cut | You need paths, editable objects, or vector operations |
| Image Format Import | A rasterized image | Image Engraving | The SVG renders incorrectly and raster engraving is an acceptable fallback |
The official setting is under Main Menu, Settings, File, Vector Import Mode. Select Vector or Image before importing according to the result you need.
Prepare a portable SVG before import
An SVG can contain much more than simple paths. Filters, masks, linked images, live fonts, patterns, and nested transformations may look correct in the program that created them but behave differently in another importer.
Keep your editable master intact. Make a separate LaserPecker delivery copy and simplify only what the job does not need:
- delete hidden, locked, or off-canvas objects;
- remove accidental background rectangles and duplicate paths;
- convert live text to outlines so the design does not depend on another computer's fonts;
- expand appearance-dependent strokes when the exact outline must survive;
- replace filters, blurs, and complex masks with simpler vector shapes or a deliberate raster element;
- close paths intended as filled regions or cut contours;
- simplify obvious node noise without changing the design;
- save explicit dimensions and note the intended physical size.
Do not flatten everything just to make import easier. Flattening the whole design into pixels gives up the reason you chose SVG in the first place.
The W3C SVG 2 paths specification explains why path data is central to portable vector geometry: paths describe shapes with commands and coordinates rather than a fixed pixel grid. That geometry is what a vector-aware importer can keep editable.
Import the SVG as vectors
1. Select Vector Import Mode
In the LDS 3.X Beta workflow documented by LaserPecker, open Main Menu, then Settings, then File. Set Vector Import Mode to Vector.
2. Import the delivery copy
LaserPecker's current software page lists SVG among the formats LDS accepts, along with raster and other design formats. Import the cleaned delivery SVG, not the untouched design master.
3. Check whether objects remain editable
Select the imported art. The important test is whether the shapes behave as vector objects, not whether the canvas merely looks correct. Verify that:
- separate intended objects can be selected;
- holes and negative spaces remain open;
- curves did not become jagged or segmented;
- no clipped or hidden artwork reappeared;
- the width and height match the intended physical size;
- the artwork stays inside the active processing area.
4. Choose the operation by geometry and material
The official import guide says vector objects can support Line Engraving, Fill Engraving, and Cut. Those modes do different jobs:
- Line Engraving follows vector outlines.
- Fill Engraving processes the interior of closed vector shapes.
- Cut follows a contour intended to pass through suitable material.
Choose the operation after import. An SVG's fill or stroke styling should not be treated as a universal machine instruction.
LaserPecker's Engraving Modes guide is the current product documentation to consult for mode behavior. Use the machine manual and LaserPecker's material guidance for settings, focus, ventilation, supervision, and allowed materials. This article does not prescribe power or speed values.
When Image Format Import is the right fallback
LaserPecker explicitly recommends trying image mode if an SVG displays incorrectly or looks inconsistent with the original design. In that mode, LDS renders the file as a raster image and supports Image Engraving.
That can be a sensible fallback for:
- shaded or textured art intended for surface engraving;
- a visually approved design whose vector effects do not survive import;
- a one-off raster engraving where object editing and cut contours are unnecessary.
It is the wrong fallback when the job requires a cut path, separately editable objects, or vector line and fill operations. Fix or rebuild the SVG instead.
Before switching modes, save a screenshot or export of the approved appearance. Compare the rasterized import with that reference so the fallback does not silently change fine detail or crop the art.
Rebuild a PNG as SVG when you need vector operations
If your source is a PNG or JPG and the intended job needs vector objects, changing the extension to .svg is not enough. The artwork must be reconstructed as paths.
The laser-cutting SVG preparation guide covers the full source-preparation, path-checking, import, and test-cut sequence.
PerfectVector's image-to-SVG workflow for laser cutting rebuilds supported flat artwork as editable vector shapes. Compare the preview with the source, reduce unwanted color fragments, and inspect the downloaded SVG before importing it into LDS. This works best for silhouettes, logos, line art, badges, and limited-color illustrations.
Use the raster directly for photographs, soft shading, and texture-rich images intended for image engraving. Automatic vectorization turns tonal detail into shapes; it does not preserve a photo's continuous appearance.
Troubleshoot a bad LaserPecker SVG import
| Symptom | Likely cause | What to try |
|---|---|---|
| Shapes are missing | Clip, mask, effect, hidden object, or unsupported structure | Replace the effect with simple paths in a delivery copy |
| Lettering changes | Live font dependency | Convert text to outlines before export |
| Artwork is filled unexpectedly | Open contours or fill-rule interaction | Close intended regions and inspect compound paths |
| Import is slow | Too many objects or nodes | Remove duplicates and simplify only redundant points |
| Size is wrong | Missing or differently interpreted document dimensions | Set explicit dimensions and verify width and height after import |
| Design looks right only in Image mode | Vector compatibility issue | Use Image mode for raster engraving, or simplify the SVG if vector operations are required |
| A line engraves twice | A thin stroke became two outline boundaries | Use an intentional centerline path or redraw one path for the operation |
Do not diagnose from the thumbnail alone. Zoom in, select the objects, preview placement, and run a small representative test on the same material.
A compact preflight checklist
Before starting the job, confirm:
- the SVG was imported in the intended Vector or Image mode;
- vector objects are still editable when vector operations are required;
- text is outlined and no linked raster is missing;
- the physical dimensions are correct;
- line, fill, cut, or image engraving is assigned deliberately;
- the design fits the active area and fixture;
- small gaps and details are realistic for the material and machine;
- the material is approved and the required enclosure, ventilation, supervision, and other safety measures are in place;
- a test has been run on representative scrap.
FAQ
Can LaserPecker Design Space import SVG files? Yes. LaserPecker's current software page lists SVG as a supported format, and its LDS 3.X Beta guide documents both vector and image import modes for SVG.
Which LaserPecker SVG import mode should I use? Use Vector mode for editable objects and Line Engraving, Fill Engraving, or Cut. Use Image mode when the SVG displays incorrectly and raster Image Engraving is acceptable.
Why does my SVG import as an image in LaserPecker? Check the Vector Import Mode setting under Main Menu, Settings, File. If Image is selected, LDS renders the SVG as a raster image.
Why does my LaserPecker SVG look different after import? Complex masks, filters, fonts, nested transforms, and other application-specific structures may not transfer cleanly. Make a delivery copy with outlined text and simpler paths, then test Vector mode again.
Can I cut an SVG imported in Image mode? Not through the behavior described in LaserPecker's current import guide. Image Format Import supports Image Engraving, while Cut is listed under Vector Format Import.
Sources
- LaserPecker Support — Vector Graphic Import Methods — Current LDS 3.X Beta vector-versus-image behavior, supported operations, fallback advice, and setting location.
- LaserPecker — Design Space software — Current accepted formats, editing features, layer modes, preview features, and software positioning.
- LaserPecker Support — Engraving Modes — Current product documentation for processing-mode behavior.
- W3C — SVG 2 Paths — Normative definition of SVG path geometry and commands.
- PerfectVector — SVG for laser cutting — Current raster-to-vector workflow, preview, output, and product boundary for laser-oriented SVG preparation.
If a flat PNG needs to become editable laser geometry, reconstruct and inspect the SVG paths, then import the cleaned delivery copy in Vector mode and prove it with a safe material test.
More from the blog

Dashed SVG Lines for Laser Cutting: Check the Paths
Diagnose dashed SVG lines that become solid in a laser preview. Compare stroke paint, separate centerlines, and outlined dashes before preparing your own file.
LightBurn Cuts Outside First: Check Groups and Layers
Diagnose outside-first LightBurn cuts with a simple SVG, closed-path checks, group and layer review, and Preview verification before choosing the job order.