
Image Rotates on Upload? Check EXIF Before Tracing
If a drawing turns sideways on upload, check EXIF orientation before tracing. Make an upright pixel copy, reopen it, and compare the vector's direction.
On this page
If a JPEG drawing looks upright in one place and turns sideways on upload, check its EXIF Orientation field. The file can store sideways pixels plus an instruction to display them upright. Make a separate copy with that instruction applied to the pixels, then clear or reset the orientation instruction. Reopen the saved copy before tracing it.
For someone photographing a drawing or lettering, the useful result is simple: the top of the artwork stays at the top, the lettering reads correctly, and you know which exact file you are uploading. Keep the original photo so you can compare directions and recover from a mistaken rotation.
Check the rotation before judging the trace
- Compare the original, the uploaded-image view, and the vector preview to locate the first change.
- Apply a valid EXIF orientation once, then save upright pixels with no further rotation instruction.
- If the saved copy is still wrong, check whether the tag is missing or incorrect before rotating again.
Stored pixels and displayed direction can differ
EXIF is image metadata. Its Orientation field describes how to orient the stored image for display. Microsoft's EXIF orientation reference distinguishes the normal state from rotations and reflections.
Three values are useful for this example:
| Orientation value | Action needed to display the stored pixels |
|---|---|
| 1 | No rotation |
| 6 | Rotate 90 degrees clockwise |
| 8 | Rotate 90 degrees counterclockwise |
These numbers describe a display instruction, not the drawing's intended subject. Other orientation values include reflections; the table is not the complete EXIF list.
A viewer that applies an instruction can show an upright image while a raw-pixel inspection shows it sideways. That gives you a testable source-file explanation to investigate. It does not, by itself, identify what a particular upload path or vectorizer did.
Use an asymmetric detail as your reference. A readable word, an arrow, or a branch on one side tells you more than a circle. Check both top/bottom and left/right; a mirrored word is a different problem from a quarter-turn rotation.
What our EXIF 1, 6 and 8 test showed
We drew an original 1200×800 raster illustration with an upward arrow, unequal branches, and the word GROW. On November 9, 2026, we saved three JPEG controls: an upright file with Orientation 1, plus sideways pixel versions with Orientation 6 and Orientation 8 that instruct the reader to display them upright. These are authored digital files, not phone-camera samples.
We applied Pillow 11.3.0's ImageOps.exif_transpose and saved PNG copies. The Pillow documentation describes the operation: apply the EXIF orientation and remove the orientation data when a transpose is needed.
| JPEG control | Stored dimensions | Saved normalized PNG | Saved Orientation field |
|---|---|---|---|
| Orientation 1 | 1200×800 | 1200×800, upright | Absent |
| Orientation 6 | 800×1200 | 1200×800, upright | Absent |
| Orientation 8 | 800×1200 | 1200×800, upright | Absent |
For each control, the saved pixels matched the expected rotation of that JPEG's decoded pixels. Applying normalization a second time changed no pixels. We also ran ImageMagick 7.1.2-32's -auto-orient on all three files: its outputs had the same decoded RGB pixels as the Pillow copies and Orientation 1.
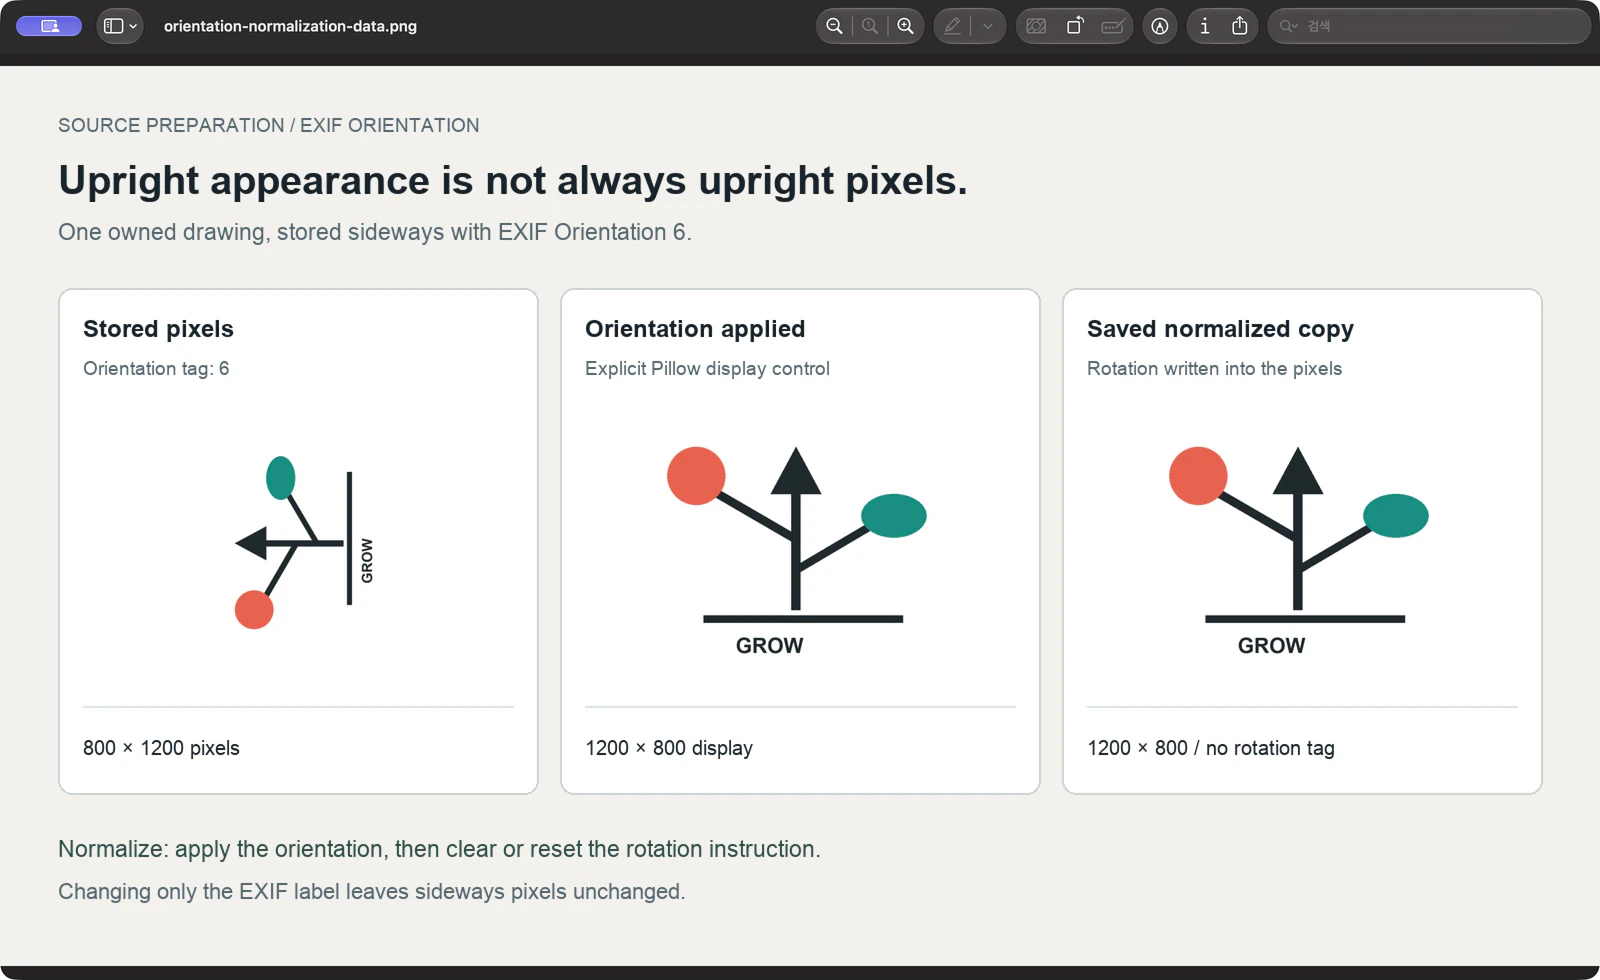
We made a failure control too: we changed only the sideways file's Orientation 6 label to 1, without recompressing or rotating its pixels. It remained 800×1200 and sideways. Physically rotating that control 90 degrees clockwise and resetting the instruction produced the same upright pixels as the normalized Orientation 6 copy.
This test establishes the file-preparation steps for those controls. It does not test a phone picker, browser upload, PerfectVector conversion, or physical cutting result.
Save an upright working copy
You need the original JPEG, a clear reference for the intended direction, and an image tool that can apply EXIF orientation to the pixels. The command route below requires ImageMagick. Work on a duplicate and give the result a distinct filename so you can select it reliably later.
- Locate the first direction change. Compare the original artwork or photo with the file in your viewer and the upload preview. Note a word or asymmetric mark that should remain on the same side. Do not assume a thumbnail proves the stored pixel direction.
- Inspect the orientation instruction. If the JPEG has a valid Orientation 6 or 8 that explains the sideways stored pixels, apply that instruction to the image data. If the field is absent, 1, or inconsistent with the artwork, use the failure checks below.
- Save the applied result as a new image. Make the pixels upright and leave the orientation instruction normal or absent. We used PNG working copies in the test, preserving the original dimensions after the quarter-turn rather than resizing or cropping the art.
- Reopen the saved copy. Check the arrow, lettering, and side-specific details against the original. Confirm the dimensions are appropriate for the intended direction and that the Orientation field no longer requests another rotation.
- Upload that exact copy and compare again. Confirm the uploaded-image view and vector preview keep the same top and sides. If the direction first changes later, keep both files and investigate that stage instead of repeatedly rotating the source.
A tested ImageMagick command
For a file whose EXIF instruction correctly describes the intended view, replace these input/output names with your own:
magick "drawing-exif6.jpg" -auto-orient "magick-normalized-exif6.png"ImageMagick documents -auto-orient as applying and resetting the orientation instruction. It also warns that already-corrected pixels with a stale instruction can be corrected again, and that removing the instruction first leaves the operator with nothing to apply.
Our test command produced an upright 1200×800 PNG with Orientation 1. Reopen your own output and inspect it; the command cannot determine the intended top of an arbitrary drawing from its subject.
If the saved copy is still sideways
Choose the next action from the actual file state:
| What you find | Next action |
|---|---|
| Sideways pixels with a valid rotation instruction | Apply the instruction once and save the result |
| Sideways pixels with Orientation 1 or no usable instruction | Use the original artwork to choose a physical pixel rotation, then save with a normal or absent instruction |
| Upright pixels with a stale rotation instruction | Correct the instruction in a duplicate without adding another unwanted pixel rotation |
| Saved raster is upright but the vector first turns later | Compare the exact source and result at that later stage; preserve both files for diagnosis |
| Lettering is reversed | Check for reflection separately; a 90-degree rotation will not unmirror the word |
A field value alone cannot tell you that the subject is upside down. For the deliberately incorrect tag 1 control in our test, we knew the right direction because we owned the original drawing. Use the same kind of reference for your work.
Rotation also does not repair a trapezoidal page, blurred ink, or missing edges. Check the scan-or-photograph workflow for capture geometry and line detail. If the direction is correct but JPEG edges look noisy, use the JPG tracing-quality checks next.
Where PerfectVector fits
PerfectVector fits when your photographed drawing needs reusable SVG shapes after the source passes its direction and detail checks. Start with the upright working copy, then compare the vector preview with that exact image: check the top edge, readable lettering, side-specific marks, and the drawing's boundaries.
Keep a usable original vector or digital drawing when you already have one. If the photo lost a stroke or clipped the paper, improve the source before tracing. Orientation normalization gives you a consistent reference; it does not restore missing artwork.
For the broader phone-to-file handoff, the iPhone SVG workflow covers choosing an image and locating the result. Carry the same direction checks into whichever device and final design tool you use.
FAQ
Why can a JPEG look upright but contain sideways pixels? Its EXIF Orientation field can instruct a reader to rotate the stored image for display. Inspect the instruction and compare with the original drawing before deciding which direction the actual pixels need.
Is changing the Orientation field to 1 enough? Only when the stored pixels are already in the intended direction. Our tag-only reset control stayed sideways because its pixels did not move. Apply the needed pixel rotation and leave the saved instruction normal or absent.
Will auto-orient fix a file with no useful orientation instruction? It cannot choose the drawing's intended top from a missing or incorrect instruction. Use the original artwork as a reference, rotate the pixels deliberately when needed, and reopen the saved copy before uploading.
Sources
- Microsoft — PhotoOrientation enumeration — Defines the EXIF orientation flag and its normal, rotation, and reflection values.
- Pillow — ImageOps.exif_transpose — Documents applying the orientation transform and removing the orientation data.
- ImageMagick — Auto-orient option — Explains orientation application/resetting and the limits of missing or stale metadata.
Have an upright drawing with the detail you need? Start free with your own image in PerfectVector. Compare the vector preview's direction, lettering, and edges with the saved source before you use it in your design.
More from the blog

Remove Blue Lines From a Drawing Before Tracing
Remove unwanted blue guides from dark ink without blindly erasing detail. Compare color channels, test a working copy, and check the drawing before tracing.

Stitch Large Drawing Scans Before Vectorizing
Join overlapping artwork sections into one raster before tracing. Match several landmarks, check a crossing stroke, and catch offset or scale errors early.