
Descreen a Scanned Logo Before Turning It Into SVG
Prepare a printed-logo scan without tracing every halftone cell. Compare a tested blur-and-threshold route with an over-blurred failure, then check the SVG.
On this page
Before vectorizing a printed-logo scan, check whether its repeating dots belong to the design. If the approved logo should have solid shapes, reduce the unwanted screen pattern in a working copy before tracing. Compare the smallest stroke and narrowest opening after each change. Stop when the cleanup erases those features, even if the result looks smoother.
Keep the untouched scan and an approved logo reference. A printed sample may be the only surviving source, but it does not tell you which texture, shading, or tiny mark the owner wants preserved. Ask for the vector or layered master first; a fresh export from that source avoids reconstructing its print reproduction.
The descreening decision
- Establish whether the dots are print screening or intentional artwork.
- Keep the original, a modestly filtered candidate, and a stronger comparison.
- Check the narrowest opening and thinnest stroke in the prepared pixels and saved SVG.
- Reject a cleaner-looking version that changes the approved design.
Separate the logo from its printed screen
A halftone represents tone with a pattern of marks and spaces. Adobe's screen-frequency guidance describes halftone cells used for grayscale images and color separations. The small repeating pattern in a printed reproduction is therefore a different thing from the logo's intended outer contour.
Here, descreening means reducing an unwanted print-screen pattern in the raster before extracting outlines. It is not simply converting an image to black and white. Thresholding a visible screen can retain its many small boundaries as vector contours, as our controlled example below shows.
Use the approved reference to choose the job:
| What the owner needs | Preparation decision |
|---|---|
| Solid logo shapes; repeating dots belong only to the reproduction | Test screen suppression while monitoring required details |
| Intentional stippling, engraved texture, or a dot-pattern design | Preserve that treatment; do not globally smooth it away |
| Shading that must remain recognizable | Agree whether to keep raster tone or rebuild the shading; a solid silhouette changes it |
| Exact lettering or a precise brand outline | Use a better master or an approved manual reconstruction when the scan cannot establish the geometry |
| Uncertain intent | Obtain a reference or approval before deciding which dots to remove |
For an intentional output pattern, use the separate halftone LPI, PPI and DPI guide. This article addresses unwanted source screening, not choosing a printer's halftone settings.
What our digital screen control showed
We authored a 512×384 flat mark with broad stems, a narrow interior slit, and a detached fine stroke. We applied a digital circular screen with a six-pixel pitch. This was a synthetic source, not a photographed print or scanner capture.
On November 9, 2026, we prepared three versions with ImageMagick 7.1.2-32: no blur, Gaussian blur with sigma 1.2, and a deliberately excessive sigma 6. All used the same 60% black/white cutoff. We saved the prepared bitmaps, traced each with Potrace 1.16 using identical options, and inspected the actual SVG files and their rendered pixels.
| Preparation | SVG path elements | SVG subpaths | Required details in the result |
|---|---|---|---|
| No blur, 60% cutoff | 2 | 1,443 | Repeated screen contours remain |
| Sigma 1.2 blur, 60% cutoff | 2 | 3 | Slit open; fine stroke remains, with waviness |
| Sigma 6 blur, 60% cutoff | 1 | 1 | Slit filled; fine stroke lost |
A subpath is a separate contour within an SVG path. The SVG paths specification permits multiple subpaths in one path element. We counted the saved files' moveto commands for this comparison; reporting only “two paths” would conceal the first file's repeated screen boundaries.
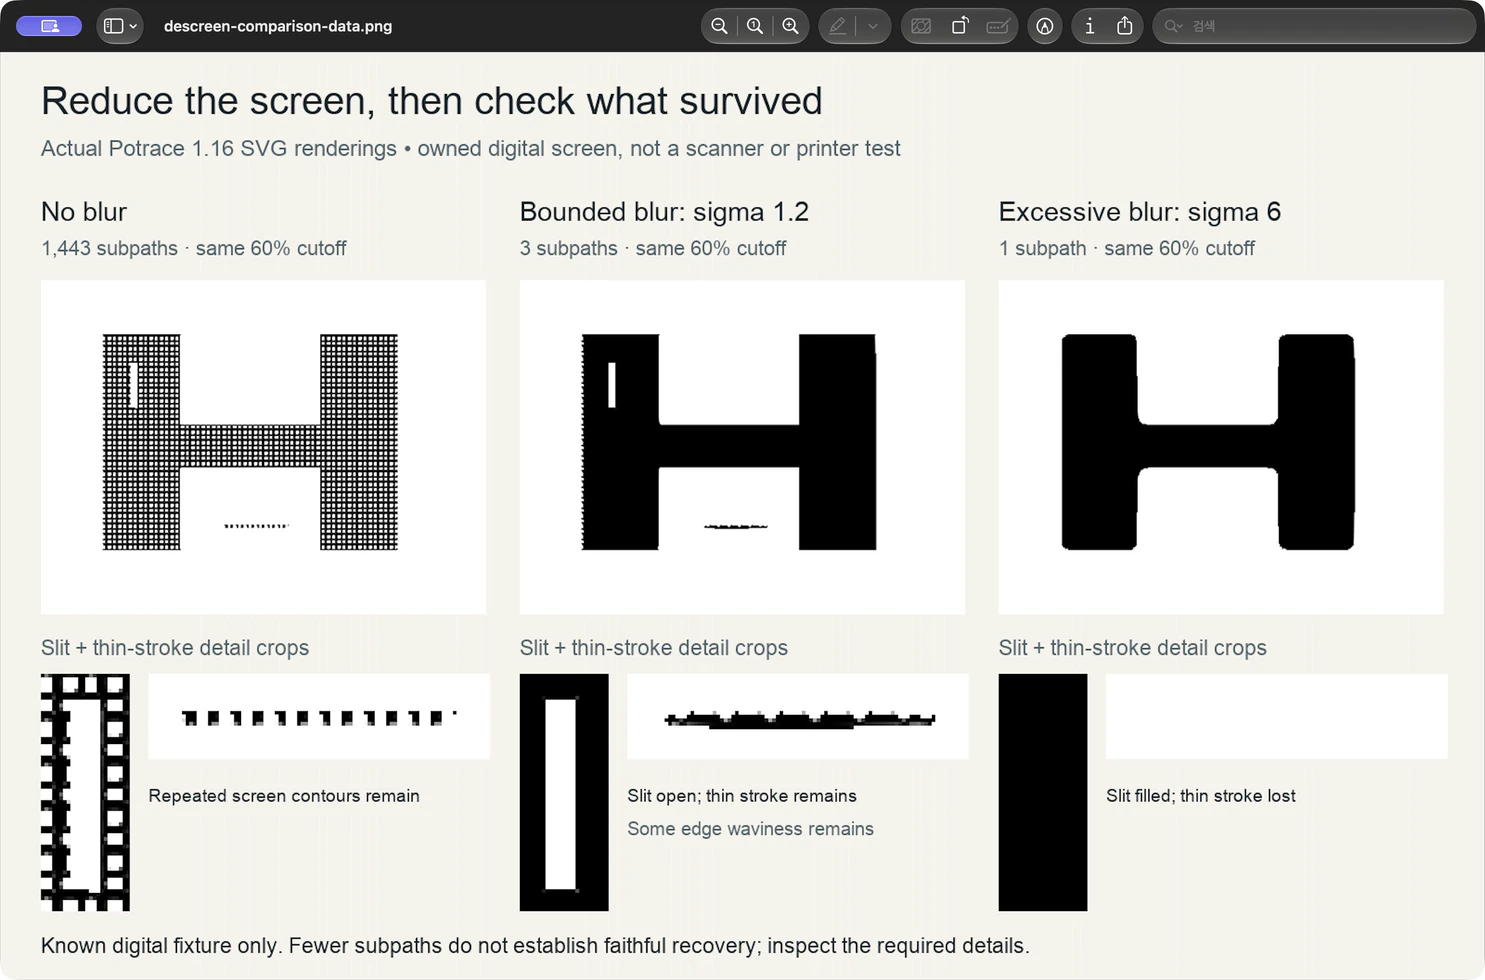
The bounded version is a candidate, not an exact recovery of the original mark. Some periodic edge waviness remains. The over-blurred version has fewer contours, but it also changes the design. Fewer contours alone are not a completion test.
Each saved SVG contained paths and no embedded image. Those observations establish these local monochrome outputs, not the behavior of another tracer or receiver. We did not test real scanner optics, different screen angles, color separations, moiré correction, or physical production.
Try a bounded preparation on a copy
You need the original image, an approved reference, and installed ImageMagick and Potrace for this optional command route. Our test used an opaque dark mark on white; it does not demonstrate a color-logo restoration or a transparent-PNG preparation workflow.
First identify three areas in your own source: a broad screened field, the narrowest opening, and the thinnest intended stroke. Use those same areas to judge every saved variant. If a clear separation between screen texture and important detail is already absent, request a better source or redraw against an approved reference.
These commands reproduce our bounded preparation from screened-input.png:
magick screened-input.png -colorspace Gray -gaussian-blur 0x1.2 -depth 8 bounded-gray.pgm
magick bounded-gray.pgm -threshold 60% bounded.pbm
potrace bounded.pbm --svg --turdsize 0 --output bounded.svg
The first command softens the pattern before the second converts it to black and white. ImageMagick's Gaussian-blur reference identifies sigma as the blur amount; zero for the radius asks the tool to choose the kernel extent. The sigma here is a source-pixel setting, not a scanner resolution or a universal descreen preset.
The last command produces a real monochrome SVG. The Potrace manual documents its bitmap inputs, SVG backend, and speckle-suppression option. We set --turdsize 0 in every test to keep that option constant rather than silently discarding small contours in one version.
For your image, save variants under different names and change one preparation control at a time. Inspect the grayscale copy before thresholding, then inspect the bitmap before tracing. If the opening fills in at the bitmap stage, the tracer cannot receive an opening that is no longer there.
Do not increase blur merely until the dots disappear. Our sigma-6 comparison lost a required stroke and filled the slit. Nor is enlarging a copy a recovery guarantee: a tested 200%-then-50% Lanczos round trip left the pattern visible in this fixture. Neither operation establishes detail missing from the original source.
Verify the saved SVG against both raster copies
Keep the untouched source and the prepared copy beside the saved SVG. Reopen the SVG and compare the same three test areas, plus the overall silhouette, at the intended use size and at an inspection zoom.
- Screened field: Has the unwanted repeating pattern stopped dominating the contours? Check for residual waviness as well as stray marks.
- Narrowest opening: Is the gap still open, with the intended shape? A smooth filled area is a failure when an opening belongs there.
- Thinnest stroke: Is it present and continuous rather than shortened, broken, or erased?
- Outer contour and lettering: Does the candidate still match the approved logo? Require an approved redraw when exact geometry cannot be established from the pixels.
Our bounded control passes the declared slit/stroke checks, but it still needs an edge-fidelity judgment. The failure control shows why a smaller file or lower contour count cannot replace that judgment.
For broader scan defects and source-quality decisions, continue with the TIFF scan preparation guide or the scan-versus-photograph workflow. Dust, capture geometry, threshold choice, and unwanted printing texture are related problems, but they need separate diagnoses.
Where PerfectVector fits after the source check
PerfectVector fits when the prepared logo contains recognizable shapes and you want a vector candidate to inspect. Start with the checked logo copy, then compare the preview with both the untouched source and your preparation. Inspect the smallest opening, thinnest stroke, lettering, and residual screen-shaped edges before using the vector in a design.
This is a source-preparation decision, not a claim that PerfectVector automatically descreens scans or reproduces our Potrace result. If the original master is available, use it. If important detail cannot survive the preparation, an approved reconstruction may be more useful than another automatic trace.
FAQ
Should I remove every dot from a scanned logo? No. Determine whether the dots belong to the artwork or only to its printed reproduction. Preserve intentional stippling or shading unless the owner approves a different treatment.
Does blur before tracing always improve the result? No. Our bounded digital control retained its slit and fine stroke, but the over-blurred control lost both. Save separate variants and compare required details in the prepared bitmap and saved SVG.
Are fewer SVG paths proof that descreening worked? No. A path can contain many subpaths, and a low-contour result can lose important detail. Check the actual silhouette, openings and strokes against the approved reference.
Sources
- Adobe — Printer resolution and screen frequency — Describes halftone cells, screen frequency, and their printing context.
- ImageMagick — Gaussian blur and command-line options — Defines the tested blur parameters; the same reference documents thresholding and resampling.
- Potrace — Manual — Documents monochrome bitmap tracing, SVG output, and the explicit speckle-suppression option.
- W3C — SVG paths — Defines path geometry and multiple subpaths within a path element.
Have a prepared logo whose important details still hold? Start free with your own image in PerfectVector. Compare its preview with your retained source and check the small openings, thin strokes, and outer edge before choosing the next editing step.
More from the blog

Remove Blue Lines From a Drawing Before Tracing
Remove unwanted blue guides from dark ink without blindly erasing detail. Compare color channels, test a working copy, and check the drawing before tracing.

Stitch Large Drawing Scans Before Vectorizing
Join overlapping artwork sections into one raster before tracing. Match several landmarks, check a crossing stroke, and catch offset or scale errors early.