Can Clip Studio Paint Vectorize Images Cleanly?
Clip Studio Paint can convert a raster layer to vector lines. Learn what Convert Layer keeps, how its settings work, and when a different tracer fits better.
On this page
- How to convert a raster layer to vector
- What the Vector settings change
- Maximum line width
- Correction
- Include white and Export all in black
- Antialiasing and Density threshold
- What converts well—and what does not
- Clean the converted vector lines
- Export the result as SVG
- When a separate vectorizer fits better
- FAQ
- Sources
Yes, Clip Studio Paint can vectorize a raster layer with Layer → Convert layer → Vector layer. The important qualifier is that Clip Studio's vector system is built around editable lines. It is excellent for recovering or refining line art, inked drawings, and brush strokes. It is not a one-click replacement for a shape-based vector editor when you need a multicolor logo rebuilt as a tidy stack of filled objects.
The result can still be exported as SVG. Clip Studio's current SVG export procedure lets you select one or more vector layers and choose File → Special Export → Export vectors. First inspect what Convert Layer actually created, because an SVG extension does not make a poor conversion useful.
The short answer
- For line art: yes. Convert Layer turns a raster layer into editable CSP vector lines.
- For full-color artwork: only with important limits. The conversion controls recognize lines and filled areas; they do not reconstruct a designer's original shapes and layers.
- For existing drawings: keep the original raster layer, tune Maximum line width, Correction, Include white, antialiasing, and Density threshold.
- For delivery: export selected vector layers as SVG, then open the file elsewhere and verify its paths.
- For photos or painterly art: keep the raster, redraw deliberately, or use a separate vectorization workflow when a stylized shape result is truly needed.
How to convert a raster layer to vector
Clip Studio's official support procedure is short:
- Select the raster layer you want to convert.
- Choose Layer → Convert layer.
- Set Type to Vector layer.
- Turn on Keep original layer so you can compare or retry safely.
- Open Vector settings, adjust the conversion, and confirm.
If the command is missing, check the edition. The current Converting layers manual says Convert Layer is not available in Clip Studio Paint DEBUT.
Imported images may arrive as image material layers rather than ordinary raster layers. If the expected conversion options are unavailable, duplicate the source, rasterize the working copy, and then run Convert Layer. Preserve the untouched original until the vector result passes inspection.
What the Vector settings change
These controls are easier to use when you think of them as recognition rules rather than quality sliders.
Maximum line width
Clip Studio uses this value to decide what counts as a line. The manual says areas thicker than the chosen maximum are recognized as fill areas, and only their outline is converted. Raise the value when parts of an intended stroke are being treated as broad filled regions. Lower it when large shapes should remain boundary-like rather than becoming stroke data.
This is why the command favors ink and line art. A shaded jacket, painted flower, or flat logo region may become an outline even though a vector designer would have built it as a filled shape.
Correction
Correction changes the number of control points. Clip Studio documents that a larger value produces fewer points and more simplified lines. Increase it when a simple stroke becomes a jittery chain of points. Stop when the simplification starts moving corners, closing narrow gaps, or changing the character of the drawing.
Include white and Export all in black
Turn on Include white in conversion only when white marks are meaningful drawing content. Leave it off when white is simply paper or transparent background. Export all in black is useful when the intended result is one-color line art; it is destructive to deliberate line colors, so keep a colored original.
Antialiasing and Density threshold
Antialiasing controls smoothing on the converted line. Density threshold sets the minimum opacity included in conversion; pixels below it are ignored. A higher threshold can discard faint scan noise, but it can also remove pale pencil construction or light ink.
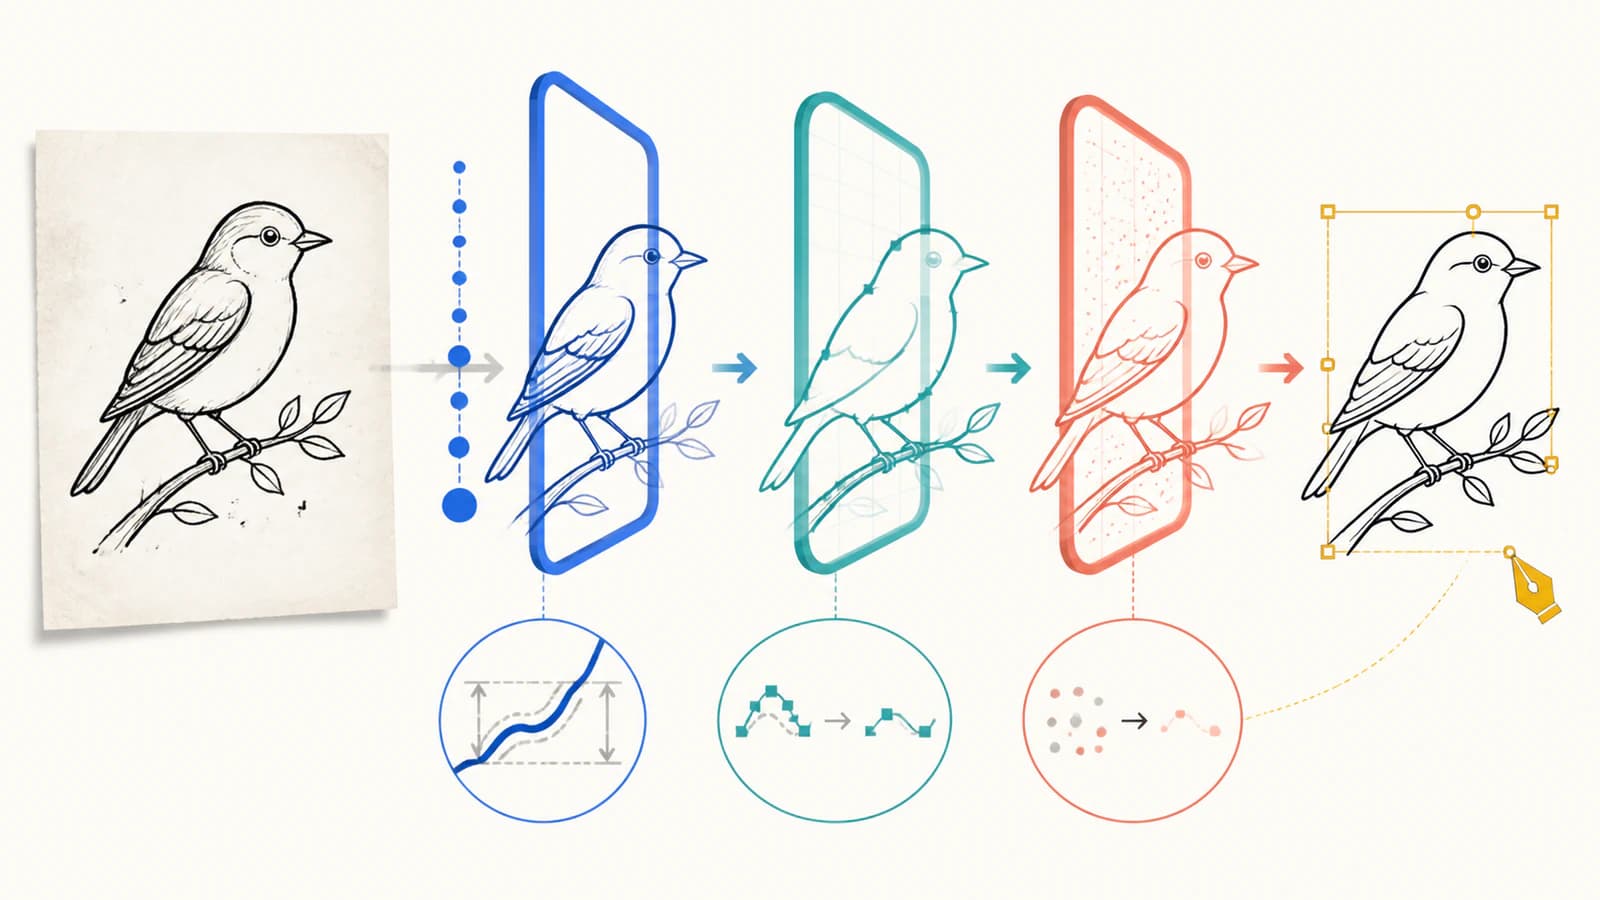
Change one control at a time and compare against the kept raster layer. Otherwise it is hard to tell which setting erased a mark or moved a contour.
What converts well—and what does not
Clip Studio Paint's official vector tools page focuses on editable lines: move them, change thickness, adjust their shape, or erase to intersections without degrading the stroke. That is the clearest clue to the feature's strongest use cases.
| Source | Convert Layer fit | Likely follow-up |
|---|---|---|
| Clean monochrome inks | Strong | Correct line shape, thickness, joins, and stray marks |
| Scanned pencil drawing | Conditional | Clean the scan; protect light intentional strokes from the density threshold |
| Colored line art | Conditional | Check whether line colors and overlaps survived as intended |
| Flat multicolor logo | Limited | Rebuild fills in a vector editor or compare a shape-based vectorizer |
| Photograph, watercolor, or soft painting | Poor | Keep raster for faithful output; trace only for an intentional stylization |
Do not confuse a CSP vector layer with the original vector construction. Conversion cannot recover a font, hidden object, original pen pressure, semantic layers, or the designer's intended geometry from flattened pixels.
Clean the converted vector lines
After conversion, hide the raster and use Clip Studio's vector editing tools on the result.
- Select individual lines with the Object tool. If everything behaves like one flat image, check the layer type.
- Zoom into corners, intersections, and line endings. Fix conspicuous drift before smoothing the whole drawing.
- Check thick marks for inner and outer outlines. A visible stroke may have been interpreted as a filled area rather than one centerline.
- Remove stray lines created from dust, paper texture, compression halos, and low-opacity marks.
- Look for excessive control points on visually simple curves. Increase Correction on a fresh conversion or simplify selectively.
- Compare line width at the final display or print size, not only while zoomed in.
For a broader test, use the vector-trace quality scorecard. It separates visual similarity from editability, negative-space accuracy, and path complexity.
Export the result as SVG
Select the vector layer or layers you want to deliver. Then use File → Special Export → Export vectors. Clip Studio's official support page says multiple selected vector layers are exported together as one SVG file.
Open that SVG in a browser and a second vector-capable application. Check that:
- the artwork stays sharp when enlarged;
- lines are selectable as vector content;
- intended colors, thicknesses, and gaps remain;
- no raster image is merely embedded inside the SVG;
- the physical size is correct for the next application.
If another app changes line appearance, preserve the .clip master and export a delivery copy. The safest handoff is the file that survives the destination, not the file that looked correct only in Clip Studio.
When a separate vectorizer fits better
Stay with Convert Layer when the source is predominantly linework and you want to keep editing it with Clip Studio's correction tools. Draw directly on vector layers whenever possible; that preserves the intended strokes and avoids interpretation from pixels.
Use a shape-oriented vectorizer or manual redraw when the source is a flat logo, icon, badge, or limited-color illustration and the output needs independent filled regions. PerfectVector's image-to-vector workflow reconstructs supported raster artwork as editable shapes that you can inspect before downloading. It does not recover original fonts, brand geometry, or hidden layers, and it may simplify texture or soft shading.
Compare the two routes on the same clean source. For line art, prefer the result that keeps natural stroke editing. For production shapes, prefer the SVG whose fills, holes, colors, and node structure require less repair.
FAQ
Can Clip Studio Paint turn a raster layer into vector? Yes. Select the raster layer, choose Layer → Convert layer, set Type to Vector layer, and adjust Vector settings. Keep the original layer so you can compare the converted lines or retry.
Why does Convert Layer outline my thick strokes? Maximum line width controls which marks count as lines. Parts thicker than the chosen value are recognized as filled areas and only their outlines are converted. Adjust the value or redraw the intended centerline.
Can Clip Studio Paint vectorize a full-color image? It can convert raster content into its line-oriented vector layer system, but it does not rebuild a flattened full-color illustration into the same tidy filled shapes and semantic layers a designer originally used. Use it for suitable line art; use another route for shape-based color reconstruction.
Can Clip Studio Paint export SVG? Yes. Select one or more vector layers, then choose File → Special Export → Export vectors. The selected vector layers are exported together as one SVG.
Is it better to draw on a vector layer from the start? Yes when you know the work should remain editable line art. Drawing directly on a vector layer preserves the strokes as vectors instead of asking Convert Layer to infer them later from pixels.
Sources
- Clip Studio Official Support — Convert a raster layer into a vector layer — Official Convert Layer procedure, Keep original layer, and Vector settings workflow.
- Clip Studio Paint User Guide — Converting layers — Current Maximum line width, Correction, color, antialiasing, Density threshold, and DEBUT availability details.
- Clip Studio Official Support — Export in SVG format — Official selection and Special Export workflow for one or more vector layers.
- Clip Studio Paint — Vector Drawing Tools for Design — First-party description of vector-line editing, resizing, thickness control, and intersection erasing.
- PerfectVector — Image to Vector — First-party description of the alternative shape-oriented raster-to-vector workflow.
If Convert Layer gives your colored artwork outlines when you need editable filled shapes, compare a shape-based vectorization, open both SVGs in the destination app, and keep the one that is easier to edit correctly.
More from the blog

Xara Bitmap Tracer: Tune the Trace and Inspect the Shapes
Use Xara Bitmap Tracer modes and controls to turn a bitmap into editable shapes. Check curves, corners, color regions, and exported artwork before delivery.

Blender Trace Image to Grease Pencil: Choose Your Route
Trace an image to Grease Pencil in Blender, fix missing commands and dense strokes, or prepare a color SVG for import. Choose the route your drawing needs.