Vectorpea Bitmap Tracing: Settings and SVG Export
Use Vectorpea's native Vectorize Bitmap button, record the trace settings, export an SVG, and inspect its actual paths, colors and openings before using it.
On this page
Vectorpea has native Vectorize Bitmap tracing. Select the raster image, use the Vectorize Bitmap button that appears in the toolbar, review the settings, then confirm and export as SVG. Our original three-color PNG produced three actual SVG paths with the intended fills and an open frame center. The saved file matters more than a smooth canvas preview.
If you want another online route for an image you already have, start free with PerfectVector and inspect the preview's silhouette, color regions and openings. Editing and export follow unlock. This walkthrough completes Vectorpea's native route and does not compare the tools' output quality.
Use the current Vectorpea app, then select the bitmap
Open Vectorpea and keep a separate copy of the original raster image. You need browser access, permission to process the artwork, and an SVG viewer or plain-text editor for the saved-file check. The clipboard-loading route below also needs image clipboard access.
Check the app name when following search results. The Photopea Vectorize Bitmap guide describes Photopea's Image menu; it is a different app workflow. Earlier discussions such as Vectorpea issue 72 provide historical context, while the current Vectorpea controls and an actual export establish what this walkthrough completed.
In our run, we created a new document and pasted the original PNG through Edit → Paste. The raster appeared in a document named image.ai. Select that raster image on the canvas. The Vectorize Bitmap button then appears in the toolbar beneath the main menus. It was immediately before the Opacity control in the tested session.
If the button is missing, first check what is selected. A document, a group of paths and an actual bitmap are different inputs. Select the raster you intend to trace before looking for a bitmap-specific command. For an existing SVG, the SVG object-type guide helps distinguish paths, groups and embedded images.
Record a baseline before changing trace settings
Click Vectorize Bitmap to open the native dialog. The tested dialog exposed Colors, Cartoon / Photo, Reduce noise and Merge colors, followed by OK. Our captured app session used Korean interface labels; the names here are their English equivalents.
We used this observed settings state for the original flat-color control:
| Control | Tested state | Detail to inspect before accepting the trace |
|---|---|---|
| Colors | 20 | Whether the intended color regions remain distinct |
| Mode | Cartoon | Whether the silhouette and corners suit the artwork |
| Reduce noise | Off | Whether small marks are intentional details or stray fragments |
| Merge colors | On | Whether regions that need separate colors remain distinguishable |
Treat this as a recorded baseline, not a universal preset. We did not compare all combinations or run a separate Photo-mode experiment. If you change a setting for your own image, change one at a time and compare a specific detail, such as a small opening or two adjacent colors.
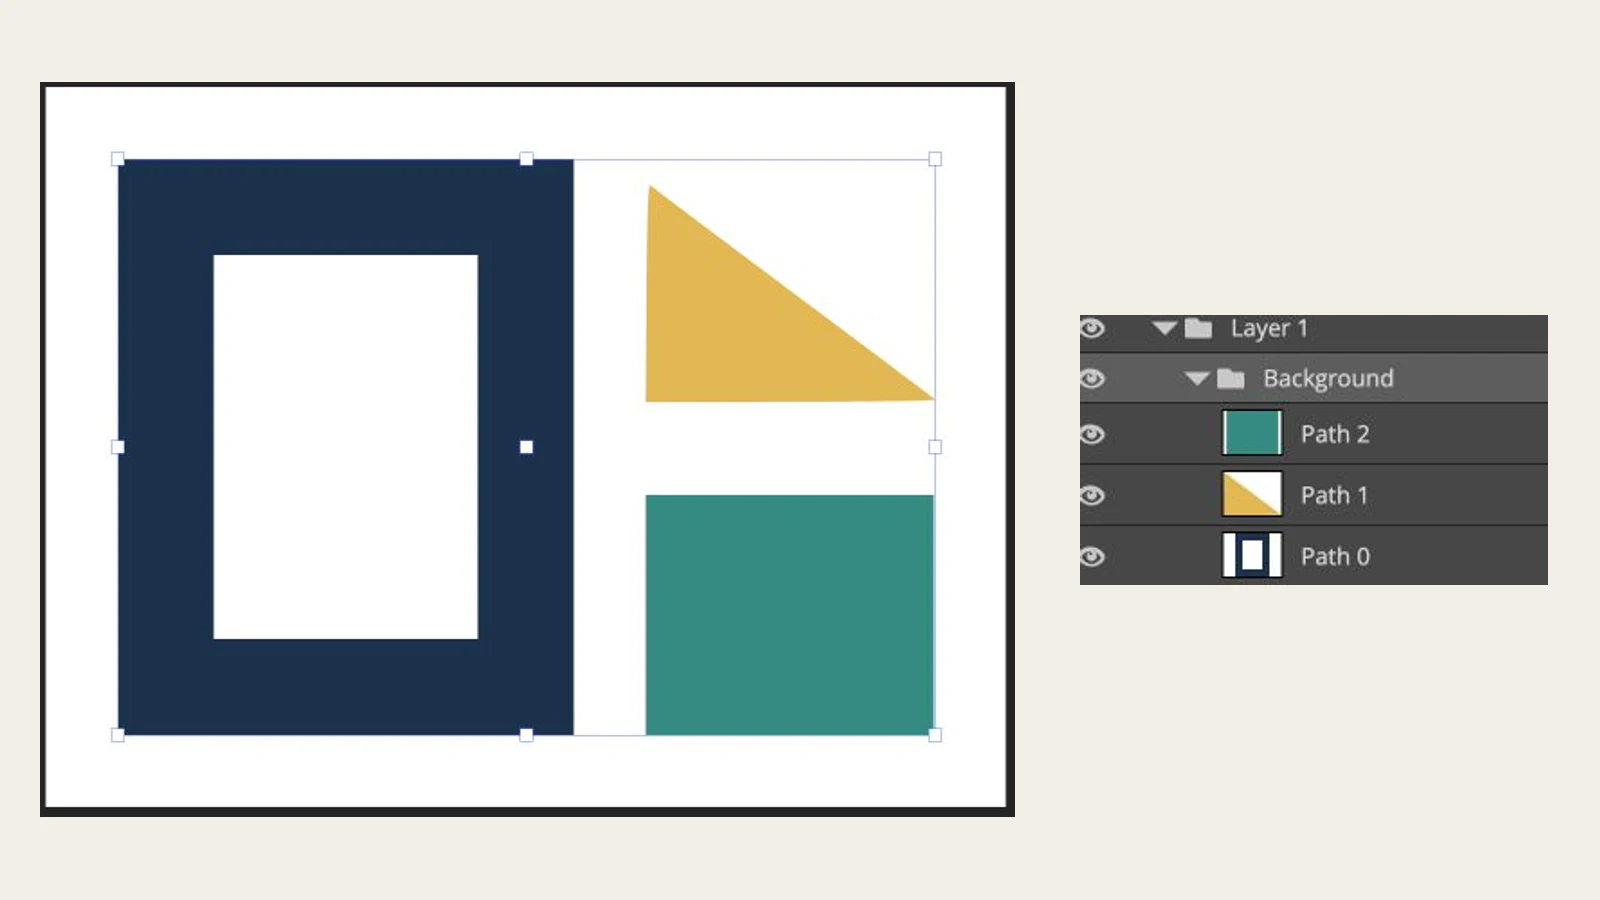
Click OK when you want to apply the trace. In our document, the Layers panel then showed Path 0, Path 1 and Path 2 under Background. Those entries are a useful first check that you are looking at the trace, but the exported SVG still needs inspection.
Export the trace as SVG
With the traced artwork present, choose File → Export As → SVG, then Save in the export flow. Keep the original PNG separately and give the SVG a distinct filename so you can compare the two later.
Our run completed that SVG export and retained the actual file. A document tab ending in .ai did not determine the exported format; the selected SVG export did. This walkthrough does not establish a native-file reopen or a later manual-edit pass.
Open the saved SVG in a viewer and inspect its text or object structure. Look for paths, any embedded image, important fill values and document bounds. For image-based or mixed content, the SVG raster-content inspection guide explains how to check what an image element references.
What the original control actually produced
We created a non-sensitive 320 × 240 PNG with a navy frame and empty center, a gold triangle and a teal rectangle on a transparent background. We pasted that original raster into Vectorpea, applied the recorded native settings and saved the resulting SVG. We then inspected the actual markup and rendered the saved file independently.
| Check | Saved result from this control |
|---|---|
| Path elements | Three, named Path 0, Path 1 and Path 2 |
| Embedded image elements | None |
| Solid fill values | #17324d, #e7b64c, #298d83, matching the three original solid regions |
| Frame opening and outside space | Transparent in the rendered SVG |
| Canvas | viewBox="0 0 320 240" |
| File size | 660 bytes |
The Colors value was 20, yet this export contained three path elements. That setting value is not an object count you can read back from every result. More generally, path count alone does not tell you whether the right details survived.
The frame path used fill-rule="evenodd". A fill rule determines which parts of a path count as inside; the SVG fill-rule specification explains how enclosed subpaths can leave an opening. Check the saved rendering over a contrasting background instead of assuming a white-looking center is transparent.
These are results from one simple geometric image and one settings state. Exact fills in this control do not establish exact-color preservation for every logo, scan or photograph. No destination-editor import, native-document reopen, manual recolor or physical output was tested.
Check your own file before calling the trace finished
Use the untouched raster beside the saved SVG and inspect four things:
- Silhouette and gaps: compare the outside contour, corners, counters and narrow separations at the size you need.
- Color regions: compare important fills with your intended palette. A region that looks close may still need a deliberate color correction.
- Empty space: place a contrasting background behind the SVG. It should show through required openings and outside areas.
- Objects and canvas: inspect the path structure and document bounds. If further editing matters, try the intended edit on a copy and verify its saved result.
| Problem | Next check |
|---|---|
| Vectorize Bitmap is not visible | Select the raster image rather than an existing path or group |
| Small features disappear | Compare the source with the baseline and the single setting you changed |
| Colors or regions do not match | Revisit Colors and the observed merge setting, then inspect the new export |
| The center of a letter or frame appears filled | Check over a contrasting background and inspect the inner contour/fill rule |
| The exported file still contains an image | Identify what was actually exported and whether the native trace was applied |
For a fuller handoff, use the vector trace quality scorecard. If an important contour is ambiguous in the raster, a manual redraw may be more useful than repeated setting changes. If you want to try another route with the same source, start free with PerfectVector and check the preview's silhouette, color regions and openings against the original.
FAQ
Does Vectorpea have a native Vectorize Bitmap feature?
Yes. In the tested current app, selecting the pasted raster exposed a Vectorize Bitmap toolbar button. Applying its dialog created visible path entries, and an actual SVG export contained paths without an embedded image.
Should I follow Photopea's Image menu instructions in Vectorpea?
Use the current Vectorpea controls. Our Vectorpea run used the toolbar button that appeared after raster selection. Photopea's documented Image menu belongs to a separate app workflow.
Does Colors 20 mean the SVG will have 20 paths?
No. Our control used Colors 20 and exported three paths. Inspect the actual objects and intended regions rather than treating the setting value as a guaranteed path count.
Did the test preserve the original colors and frame opening?
Yes, for this original three-color control. The SVG contained the three exact solid fill values, and the rendered frame opening and outside space were transparent. This does not guarantee the same result for every image.
Sources
- Vectorpea app — native tracing controls and the completed SVG export workflow.
- Photopea Vectorize Bitmap documentation — identifies the separate Photopea menu workflow that can appear in search results.
- Vectorpea issue 72 — historical feature-request context, distinct from current app evidence.
- W3C SVG fill rules — enclosed subpaths and the evenodd fill rule.
More from the blog

Vectorization Org: Check a Black-and-White Trace
Vectorization.org turns images into black-and-white vectors. Follow a real PNG-to-SVG run and check lost colors, small features and saved geometry before use.

Boxy SVG Vectorize Image: Trace or Import Paths?
Boxy SVG has a Vectorize generator. Choose tracing, geometric styling, or an imported SVG, then check editable regions and holes before using your artwork.