Easy Cut Studio Image Trace: Native Trace or Clean SVG?
Trace an image in Easy Cut Studio or import a cleaner SVG. Compare both routes, inspect closed paths and layers, then verify the file with a small test cut.
On this page
- What Easy Cut Studio's image trace does
- Prepare the bitmap before native tracing
- Run the native trace first
- Compare it with a clean imported SVG
- Audit both candidates as cutter geometry
- Separate tracing problems from cutter problems
- Print-and-cut needs a deliberate contour
- Cricut and demo-version boundaries
- When each route is the better choice
- Final checklist
- FAQ
- Sources
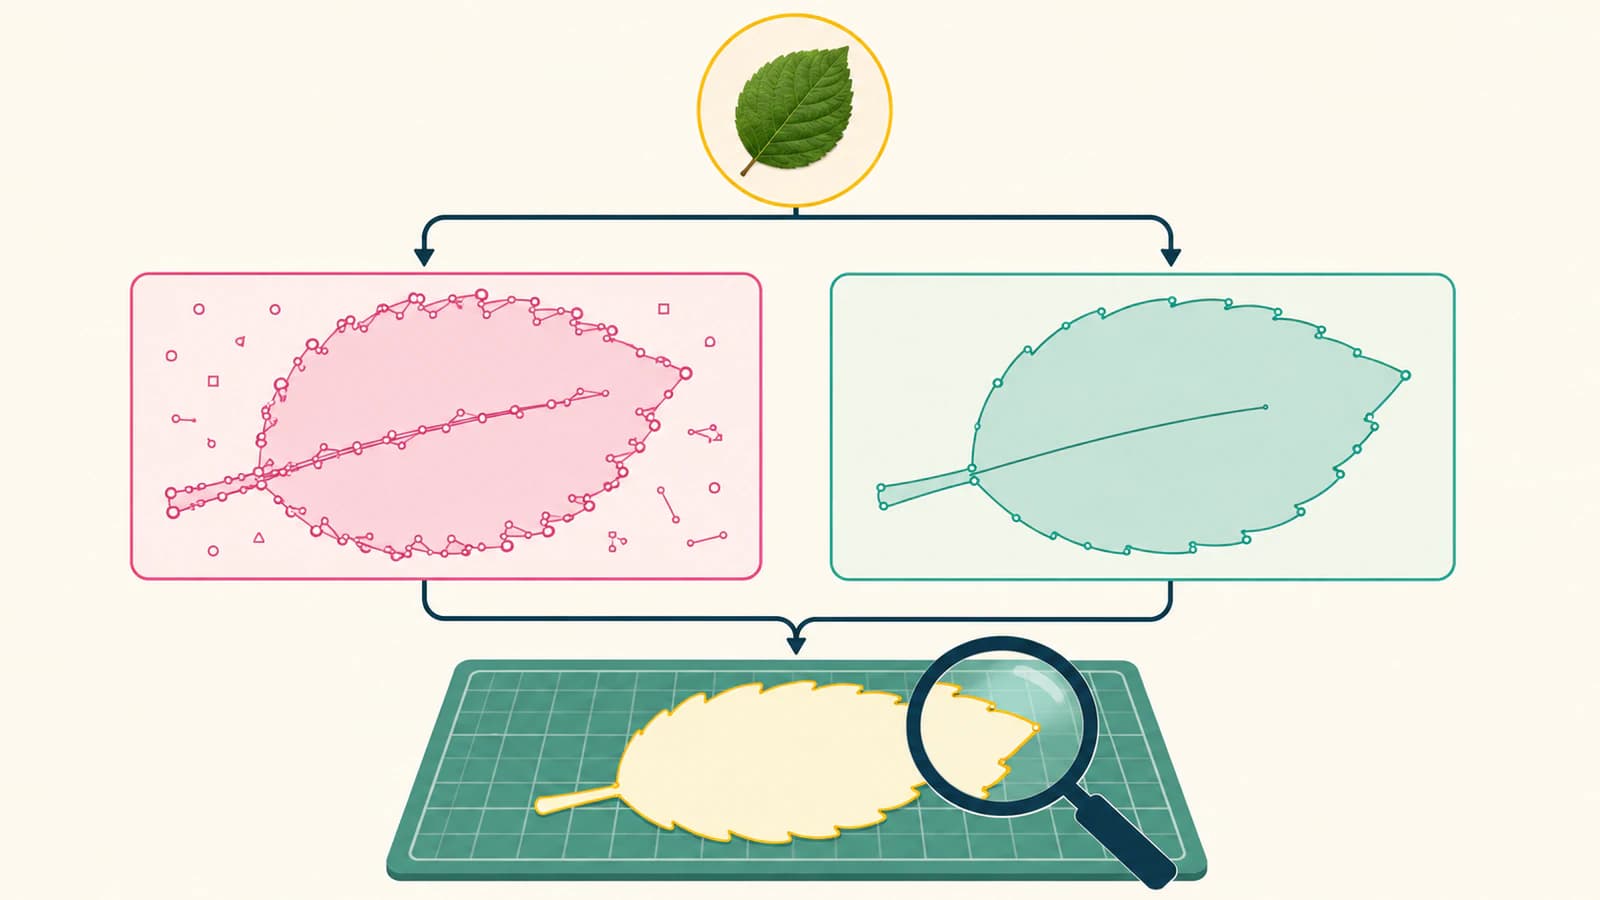
Easy Cut Studio can trace imported bitmap images into editable vector paths. Run its native trace first when the source is a clean, high-contrast logo or silhouette. Import a separately prepared SVG when the native result keeps following pixel noise, damaging small holes, or creating more node cleanup than the artwork justifies.
The route is only the first decision. Before cutting, inspect the chosen paths at the final physical size, remove duplicate contours, close shapes that must be closed, assign only the intended layers to output, and run a small test on representative material.
Compare both routes fairly
- Use the same clean source for the native trace and external SVG.
- Set both candidates to the same physical dimensions.
- Hide the source bitmap and inspect paths, holes, overlaps, and nodes.
- Keep the candidate that preserves the design with fewer risky repairs.
- Verify layers, cutter settings, and a test cut separately from vector quality.
What Easy Cut Studio's image trace does
The current Easy Cut Studio product page describes version 6's tracing tool as converting imported graphics and scans into editable, cuttable vector paths. The listed raster inputs include JPG, PNG, GIF, PSD, TIFF, BMP, and TGA; the page also lists PDF among accepted imports.
The output is reconstructed geometry. It is not the original image with infinite resolution. A tracer interprets visible boundaries, so a clean black silhouette can become a simple contour while a small JPEG may turn compression blocks and soft edge colors into extra paths.
Easy Cut Studio's official tracing video demonstrates the bitmap-to-cut-path purpose, but it was published years before the current version. Treat its old interface as historical. Use the labels in your installed build while following the source preparation and output checks below.
Prepare the bitmap before native tracing
Start with the largest original file you can find. Do not use a screenshot of a preview if the designer can supply the PNG, PDF, or vector master.
For a raster source:
- Crop away unrelated canvas space and page borders.
- Straighten photographed artwork and remove perspective distortion.
- Make the subject clearly different from the background.
- Remove dust, shadows, and isolated compression blocks that are not part of the design.
- Preserve intentional gaps and letter counters instead of crushing them with excessive contrast.
- Decide the final cut size before approving tiny details.
A transparent background can prevent a page-sized rectangle from becoming a path, but transparency does not repair a weak edge. Inspect the alpha boundary against a contrasting color before tracing.
Run the native trace first
The exact names and positions of controls can differ by Easy Cut Studio release and platform. In the current build, the practical sequence is:
- Import the raster image and select it.
- Open the image tracing or vectorizing tool.
- Choose the simplest trace mode that matches the artwork.
- Adjust the preview until the intended foreground is included without collecting background noise.
- Create the vector result and move the source bitmap aside or hide it.
- Enter outline or node editing and inspect the new paths.
- Save an editable project copy before simplifying or welding anything.
Do not maximize detail by habit. A cutter follows geometry. Every accidental speck can become a tiny object, and every pixel-shaped wobble can add direction changes. The best trace is the simplest one that still preserves the intended silhouette, corners, gaps, and holes.
The current product page also documents node editing and a simplify feature. Simplify only after comparing the edited contour with the source. It can remove redundant points, but an aggressive pass can move a corner or close a narrow gap.
Compare it with a clean imported SVG
When the native result needs extensive repair, keep it for comparison and create one external vector candidate from the same source. For flat art with clear filled regions, prepare an SVG for a cutting workflow with PerfectVector, then import the file into a fresh Easy Cut Studio document.
PerfectVector reconstructs visible raster regions as filled SVG shapes. It does not choose your blade path, registration setup, pressure, speed, or material. It is also not a centerline tracer. Photos, gradient-heavy art, and pen-plotter drawings may need a different workflow.
Easy Cut Studio's homepage says the application can cut SVG, AI, and PDF content and supports more than 20 import/export formats. Its official FAQ lists SVG, AI, PNG, EPS, and PDF among supported formats. Support does not prove that every complex effect will survive. Flatten unsupported effects deliberately or simplify them in a vector editor before import.
Audit both candidates as cutter geometry
Use outline or wireframe view when possible. A filled preview can hide duplicate paths and unwanted internal boundaries.
| Check | What to look for | Why it matters |
|---|---|---|
| Outer contour | No dents, false bumps, or clipped corners | The blade follows the boundary, not the visual intention |
| Interior holes | Letter counters and icon cutouts remain open | Missing holes change the design and the weeded result |
| Duplicate paths | One intended path per cut boundary | Stacked copies can produce repeated passes |
| Open paths | Shapes that must fill or cut as loops are closed | Gaps can break fills and contour operations |
| Color regions | Only deliberate production colors remain | Edge colors can create unwanted layers and objects |
| Nodes | Curves are editable without tracing every noisy pixel | Excess points slow cleanup and can make motion rough |
| Size | Width and height match the physical job | Clean geometry at the wrong scale wastes material |
| Layers | Only intended objects are set to cut, score, draw, or print | Good paths can still be sent to the wrong operation |
Easy Cut Studio's FAQ says shapes fill only when closed by default and points to Path > Close Path for an open shape. Closing a path draws a segment between its endpoints. Confirm that this segment belongs in the design; do not use Close Path as a blanket repair for unrelated fragments.
SVG paths can contain multiple subpaths, curves, lines, and closures. The W3C path specification is the underlying model, while Easy Cut Studio exposes it through its editing and cutting tools.
Separate tracing problems from cutter problems
A rough contour visible on screen is a geometry problem. A clean path that cuts at the wrong size, fails to weed, or shifts on the material may be a machine, calibration, blade, pressure, speed, mat, registration, or media-feed problem.
Check in this order:
- Preview only the objects assigned to the current operation.
- Confirm final dimensions and orientation.
- Check the cutter model, connection, and origin.
- Verify blade condition, offset, pressure, speed, and material.
- Run a small representative test before the full job.
Retracing after every failed cut can make a good file worse. Change one observable cause at a time.
Print-and-cut needs a deliberate contour
Tracing a color image can create paths around every color region. A print-and-cut sticker usually needs one deliberate outer contour, perhaps with an offset, plus the registration workflow expected by the cutter.
The current product page documents contour paths, registration marks, and layer assignments for print, cut, score, draw, or combined output. Do not mark all internal color boundaries for cutting. Hide the printed artwork and preview the cut-only layer by itself.
If you see the same boundary twice, use the double-line tracing diagnosis before deleting paths. A thick stroke traced as a filled band legitimately has two edges; a stacked duplicate is a different problem.
Cricut and demo-version boundaries
Easy Cut Studio's FAQ says it does not cut directly to Cricut machines. For a compatible Cricut model and Design Space workflow, export an SVG and upload it to Design Space. Confirm current Cricut format and machine guidance before relying on that handoff.
The same FAQ says the Easy Cut Studio demo adds horizontal watermark lines to cut output and disables save and export. A marked demo cut is not evidence that your trace has duplicate geometry. Judge path quality on screen, then use the licensed workflow or the vendor's current trial terms for an unmarked production file.
When each route is the better choice
Keep the native Easy Cut Studio trace when:
- the source is a clean silhouette or simple flat graphic;
- the preview preserves holes and sharp corners;
- cleanup is short and predictable;
- the artwork will stay inside the Easy Cut Studio project;
- immediate cutter setup matters more than a reusable external master.
Try an imported SVG when:
- JPEG noise keeps becoming small objects;
- curves remain lumpy after reasonable source cleanup;
- small lettering or counters repeatedly break;
- the artwork needs a reusable master for other applications;
- a separately generated SVG needs fewer and safer repairs.
Redraw the artwork when legal brand accuracy, precise typography, symmetry, or technical geometry matters more than automatic tracing speed. Keep photography raster when the job is a printed image rather than cut shapes.
Final checklist
- The best available source was used.
- Native and external candidates were compared at the same dimensions.
- The silhouette, corners, holes, and small gaps match the reference.
- Background rectangles and stray fragments are gone.
- No cut boundary has an accidental duplicate.
- Required shapes are closed without false connector segments.
- Nodes are manageable and important geometry is unchanged.
- Only intended objects are assigned to the current output.
- Cutter, material, blade, pressure, speed, and scale were checked separately.
- A representative test cut passed.
FAQ
How do I trace an image in Easy Cut Studio? Import and select the bitmap, open the image tracing or vectorizing tool in your installed build, choose the simplest suitable mode, and adjust the preview so it includes the intended artwork without background noise. Create the paths, hide the bitmap, and inspect the result in outline or node view.
Which image formats can Easy Cut Studio trace? The current product page lists JPG, PNG, GIF, PSD, PDF, TIFF, BMP, TGA, and scanned images for its tracing workflow. Format support and PDF contents can vary, so check the current documentation and inspect what actually imports.
Why does my trace have too many nodes? The tracer may be following compression blocks, anti-aliased edge colors, paper texture, shadows, or detail too small for the final job. Clean the source and reduce unnecessary detail before simplifying paths. Compare every simplification with the reference.
Can Easy Cut Studio import SVG files? Yes. The current product page and FAQ list SVG support. After import, verify physical size, closed paths, color regions, layer assignments, and any effects that may have been flattened or interpreted differently.
Can Easy Cut Studio cut directly to Cricut? Its current FAQ says no. It says Cricut Explore users can export SVG from Easy Cut Studio and upload the SVG into Cricut Design Space. Check current compatibility for your specific machine and software version.
Sources
- Easy Cut Studio — Official product page — Current version-6 tracing, format, node-editing, layer, print-and-cut, and cutter-control claims.
- EasyCutStudio — Tracing Image to Vector Paths Ready for Cutting — Official channel demonstration and description of the bitmap-to-cut-path purpose.
- Easy Cut Studio — Frequently Asked Questions — Demo restrictions, closed-path behavior, SVG support, layer visibility, and the Cricut handoff boundary.
- W3C — SVG Paths — Specification model for path data, subpaths, curves, and closures.
If the native trace keeps reproducing pixel damage, make one SVG candidate for the cutting workflow, compare it at the final size, and keep it only after its paths, layers, and small test cut pass inspection.
More from the blog

Shared Laser Edges: Preserve the Internal Cut Line
Compare adjacent closed shapes, a graph with one shared cut edge, and a union outline. Inspect original SVG lengths before preparing a common-line laser job.

Dashed SVG Lines for Laser Cutting: Check the Paths
Diagnose dashed SVG lines that become solid in a laser preview. Compare stroke paint, separate centerlines, and outlined dashes before preparing your own file.